Tuesday, February 15, 2011

Add Speech Bubbles Tooltip in Blogger

What is Speech Bubbles Tooltip?

Description : Speech Bubbles Tooltip lets you add tooltips to links using either the value of the link's title attribute, or rich HTML defined all inside a single HTML file and fetched using Ajax instead.


Now, let's add it to your blog.

Steps :
1. Go to your Dashboard >> Design >> Edit HTML >> Check Expand Widget Templates.

2. Search this code (Ctrl + F), </head>

3. Copy and paste this just CODE above </head> tag.

4. Save your template.

5. To Apply the Speech Bubbles Tooltip you need to add title="YOUR DESCRIPTION" class="addspeech" on each link you want the tooltip to show up. Example :
<a title="YOUR DESCRIPTION" class="addspeech" href=http://www.place2how-to.com>HOW-TO HOUSE</a>

Yeah! It's DONE! Like it? You gonna like it!

You also can add this style of tooltip.


source : dynamicdrive

Sunday, February 13, 2011

Change Newer Posts and Older Posts with Post Titles like Worpress

Do you want to change your Newer Posts and Older Posts with your Post titles? We always see this trick only in wordpress blogs. But now, you can apply it into your blog. It also can attract more reader because they can stop to see your post title. Let's try it. Just in 3 steps.


Example : After apply the hack code

Steps :
1. Go to your Dashboard >> Design >> Page Element >> Add a Gadget.


2. Paste this code below in it.

3. Save & DONE!


Refresh your blog to see the result.

Friday, February 11, 2011

How To Change Blogger Comment Box Width and Height

Do you want to change the width and height of blogger comment box to make it look nice and fit your post page width. You only need to modify this code.

1. Go to your Dashboard >> Design >> Edit HTML >> Check Expand Widget Templates.

2. Search this code (Ctrl + F), or similar something :
<iframe allowtransparency='true' class='blogger-iframe-colorize blogger-comment-from-post' frameborder='0' height='410' id='comment-editor' name='comment-editor' src='' width='100%'/>

3. Change the bold code :

height='?' >> to any number you want.

Change it from width='100%' to any value you want but not with % anymore. Change it to px. Example : width='500px'


Example :
<iframe allowtransparency='true' class='blogger-iframe-colorize blogger-comment-from-post' frameborder='0' height='410' id='comment-editor' name='comment-editor' src='' width='500px'/>

4. Save your template & DONE!

This is a simple trick! Have a try guys. GOOD LUCK!

Tuesday, February 8, 2011

Add 'Bookmark This Site' Widget in Blogger

Bookmark page is serves to store page that you like in the browser's bookmarks. If visitors are interested with the content of your site, they will bookmark your blog/website. It will be easier to track website visitors easily. However, you can add a widget to make this bookmarking process more easier and with some style. Only use a Bookmark Site Script. See demo.


Do you wanna add it into your blog? Here we go..

Steps
1. Go to your Dashboard >> Design >> Page Element >> Add a Gadget.


2. Paste this code below in it :
<script type="text/javascript">

/***********************************************
* Bookmark site script- © Dynamic Drive DHTML code library (www.dynamicdrive.com)
* This notice MUST stay intact for legal use
* Visit Dynamic Drive at http://www.dynamicdrive.com/ for full source code
* Shared by Alfian J. @ HOW-TO HOUSE www.place2how-to.com
***********************************************/

function bookmarksite(title,url){
if (window.sidebar) // firefox
    window.sidebar.addPanel(title, url, "");
else if(window.opera && window.print){ // opera
    var elem = document.createElement('a');
    elem.setAttribute('href',url);
    elem.setAttribute('title',title);
    elem.setAttribute('rel','sidebar');
    elem.click();
}
else if(document.all)// ie
    window.external.AddFavorite(url, title);
}
</script>
<a href="javascript:bookmarksite('YOUR BLOG/SITE NAME', 'YOUR BLOG URL')">BOOKMARK THIS SITE!</a>

or you can use image for this bookmark widget, use this code :
<script type="text/javascript">

/***********************************************
* Bookmark site script- © Dynamic Drive DHTML code library (www.dynamicdrive.com)
* This notice MUST stay intact for legal use
* Visit Dynamic Drive at http://www.dynamicdrive.com/ for full source code
* Shared by Alfian J. @ HOW-TO HOUSE www.place2how-to.com
***********************************************/

function bookmarksite(title,url){
if (window.sidebar) // firefox
    window.sidebar.addPanel(title, url, "");
else if(window.opera && window.print){ // opera
    var elem = document.createElement('a');
    elem.setAttribute('href',url);
    elem.setAttribute('title',title);
    elem.setAttribute('rel','sidebar');
    elem.click();
}
else if(document.all)// ie
    window.external.AddFavorite(url, title);
}
</script>
<a href="javascript:bookmarksite('YOUR BLOG/SITE NAME', 'YOUR BLOG/SITE URL')"><img src="https://blogger.googleusercontent.com/img/b/R29vZ2xl/AVvXsEipHCOr4gn0BbrINxA-DQ1gvXND9k79FR-n3NIytZFnxsDIdHcDK6NHZfvT7fWJpwCy4Ex0q5u86RtOMg80W3usz3nO4H3Bt5VifQRkROxwj_19Cvi3d8m8K2ZfaocjkvnpMHOX-S1oGXU/" /></a>

Customization
Change details code in bold text.

YOUR BLOG/SITE NAME = replace with your blog name.

YOUR BLOG/SITE URL = replace with your blog URL.

BOOKMARK THIS SITE! = replace with your own word. (Optional)

https://blogger.googleusercontent.com/img/b/R29vZ2xl/AVvXsEipHCOr4gn0BbrINxA-DQ1gvXND9k79FR-n3NIytZFnxsDIdHcDK6NHZfvT7fWJpwCy4Ex0q5u86RtOMg80W3usz3nO4H3Bt5VifQRkROxwj_19Cvi3d8m8K2ZfaocjkvnpMHOX-S1oGXU/ = replace with your own Bookmark image.(Optional)

3. Save and DONE!

Enjoy this Bookmark Site Widget. Hopefully this widget help to increase your blog reader.


source : dynamicdrive

Add Font Resizer Widget in Blogger

You feel more comfortable reading with big or small font? Some likes big font and there is also like a small font. Some of your blog visitors may be not comfortable with the font used in your blog. So you can add a Font Resizer widget on your blog


Only use a simple script. Let's start :

1. Go to your Dashboard >> Design >> Page Element >> Add a Gadget.


2. Paste this code below in it :
<div align="center">
<script type="text/javascript" src="https://sites.google.com/site/howtohouse/hth-scripts/howtohouse-textsizer.js?attredirects=0&d=1">

/***********************************************
* Document Text Sizer- Copyright 2003 - Taewook Kang.  All rights reserved.
* Coded by: Taewook Kang (http://www.txkang.com)
* This notice must stay intact for use
* Visit http://www.dynamicdrive.com/ for full source code
* Shared by Alfian J. @ HOW-TO HOUSE www.place2how-to.com
***********************************************/

</script>
<a href="javascript:ts('body',1)">  Larger Font</a> | <a
href="javascript:ts('body',-1)">  Smaller Font</a
href="javascript:ts('body',-1)">
<hr/>
</div>
3. Save & DONE!

Now your blog reader can choose whether to read in bigger font or smaller font.


source : dynamicdrive

Sunday, February 6, 2011

Add Breadcrumb Navigation in Blogger

Breadcrumb navigation? What is breadcrumb navigation? Definition of breadcrumb :
Breadcrumbs or breadcrumb trail is a navigation aid used in user interfaces. It gives users a way to keep track of their location within programs or documents. - Wikipedia.

Breadcrumb navigation looks something like this :


Do you like it? Wanna add Breadcrumb in your blog? Let's do it.

1. Go to your Dashboard >> Design >> Edit HTML >> Check Expand Widget Templates.

2. Search this code (Ctrl + F), ]]></b:skin>

3. Add the code below, just before the ]]></b:skin>
.breadcrumbs {
padding:5px 5px 5px 0px;
margin: 0px 0px 15px 0px;
font-size:95%;
line-height: 1.4em;
border-bottom:3px double #333333;
}

4. Now search this code (Ctrl + F),
<b:include data='top' name='status-message'/>

5. Replace it with this code,
<b:include data='top' name='status-message'/>
<b:include data='posts' name='breadcrumb'/>

6. Then, find this code,
<b:includable id='main' var='top'>

7. Replace it with this code.

8. Save your template and DONE!

Also, this hack is good for your blog SEO. Enjoy this Breadcrumb Navigation.


Saturday, February 5, 2011

How To Add Floating Notification Bar with Close Button

Do you want to tell/notify something to your blog readers with a more efficient way? What if you use "Floating Notification Bar" script to notify your friends. What is "Floating Bar Notification"? See demo.


Interested? Follow this tutorial to add the script.

Note : Save your templates before make any changes.

Steps

1. Go to your Dashboard >> Design >> Edit HTML >> without Check Expand Widget Templates.

2. Search this code (Ctrl + F), <head>

3. Add this code, just under the <head> tag.

4. Save your template.

5. Now, go to your Dashboard >> Design >> Page Element >> Add a Gadget.


6. Paste this code below in it :
<div id="topbar">
<a href="" onClick="closebar(); return false"><img src="http://preview.shareapic.net/preview7/024366390.gif" width="15" height="15" border="0" /></a>
Your content here
</div>

7. Replace Your content here with your own notification/content.

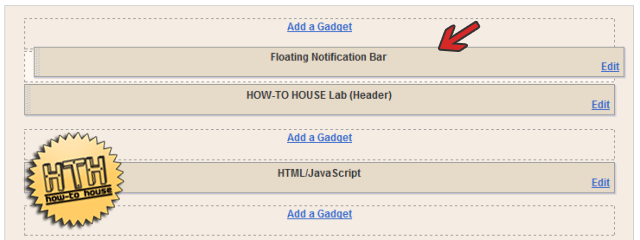
8. Make sure to place the page element on the most top and Save. [screenshot]


DONE!

Like this script? Recommend and share it to your friends!

source : dynamicdrive

Tuesday, February 1, 2011

How To Embed Youtube Subscribe Widget on Blog

Everybody knows how Youtube works and it become the most popular place to search any video. Do you? So, HOW-TO HOUSE will guide how to embed Youtube Subscribe Widget on your blog. It's simple and easy. You can add the widget in just 3 steps :

1. Go to your Dashboard >> Design >> Page Element >> Add a Gadget.


2. Copy and paste this code below in it :
<iframe src=http://www.youtube.com/subscribe_widget?p=YOUR CHANNEL NAME style="overflow: hidden; height: 105px; width: 300px; border: 0;" scrolling="no" frameBorder="0"></iframe>
3. Save and DONE!


Customization

You can change the height & width edit the code in red.

And, the widget will look something like this.


Followers

Sponsor

 
Powered by Blogger.