Sunday, December 12, 2010

Add Related Posts Widget With Thumbnail in Blogger


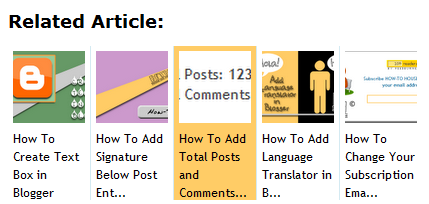
Before this, HOW-TO HOUSE give you tutorial about Related Posts Widget, and this entry is about Related widget but with thumbnail. With this widget, your related posts will appear with it's thumbnail.

It look something like LinkWithin widget, see screenshot below :

Steps :
1. Go to your Dashboard > Design > Edit HTML > Check Expand Widget Templates. 

2. Find this code </head> 

3. Paste this code below, above </head> 
<b:if align='right' cond='data:blog.pageType == &quot;item&quot;'>
<style type='text/css'>
#related-posts {
float:center;
text-transform:none;
height:100%;
min-height:100%;
padding-top:5px;
padding-left:5px;
}
#related-posts h2{
font-size: 1.6em;
font-weight: bold;
color: black;
font-family: Georgia, &#8220;Times New Roman&#8221;, Times, serif;
margin-bottom: 0.75em;
margin-top: 0em;
padding-top: 0em;
}
#related-posts a{
color:black;
}
#related-posts a:hover{
color:black;
}
#related-posts a:hover {
background-color:#dddddd;
}
</style>
<script src='http://howtohouse.googlecode.com/files/relatedpostthumbs.js' type='text/javascript'/>
</b:if>

4. Then, find this code :

<data:post.body/>
or,
<div class='post-footer-line post-footer-line-1'>  
or this,  
<p class='post-footer-line post-footer-line-1'> 


6. Save your template. DONE!

Customization : 

1. Adjust the maximum number of related posts being displayed. Edit the value on the code below. Change '12' to any value you desired.

var maxresults=12;


2. Edit the title of the widget by change this line of code :
var relatedpoststitle="Related Posts"

ENJOY!

Add Related Posts Widget in Blogger


In the previous entry, we had a tutorial to add Related Post Widget using LinkWithin, here. Now, if you want more stylish and look simple but professional, you can try to use this widget. This related articles will choose your other posts  from same category or labels. With this widget, your readers will remain in your blog as they wanted to read your other posts.

Let's start :

Note : Before make any changes, backup your  templates.

1. Go to your Dashboard > Design > Edit HTML > Check Expand Widget Templates.

2. Find this code </head> 

3. Put this code below, above </head>
<style> #related-posts { float : left; width : 480px; margin-top:20px; margin-left : 5px; margin-bottom:20px; font : 11px Verdana; margin-bottom:10px; } #related-posts .widget { list-style-type : none; margin : 5px 0 5px 0; padding : 0; } #related-posts .widget h2, #related-posts h2 { font-size : 20px; font-weight : normal; margin : 5px 7px 0; padding : 0 0 5px; } #related-posts a { text-decoration : none; } #related-posts a:hover { text-decoration : none; } #related-posts ul { border : medium none; margin : 10px; padding : 0; } #related-posts ul li { display : block; background : url("https://sites.google.com/site/howtohouse/tools/howtohousefavicon-3.ico") no-repeat 0 0; margin : 0; padding-top : 0; padding-right : 0; padding-bottom : 1px; padding-left : 21px; margin-bottom : 5px; line-height : 2em; border-bottom:1px dotted #cccccc; } </style> <script src='https://sites.google.com/site/howtohouse/hth-scripts/howtohouse-RelatedPost.js' type='text/javascript'/>

4. Now, find this code <data:post.body/> . If you can't find it, find this code <div class='post-body>

5. Put this code below, under it :
<b:if cond='data:blog.pageType == "item"'>
<div id="related-posts">
<font face='Arial' size='3'><b>Related Posts : </b></font><font color='#FFFFFF'><b:loop values='data:post.labels' var='label'><data:label.name/><b:if cond='data:label.isLast != &quot;true&quot;'>,</b:if><b:if cond='data:blog.pageType == &quot;item&quot;'>
<script expr:src='&quot;/feeds/posts/default/-/&quot;   data:label.name   &quot;?alt=json-in-script&amp;callback=related_results_labels&amp;max-results=5&quot;' type='text/javascript'/></b:if></b:loop> </font>
<script type='text/javascript'> removeRelatedDuplicates(); printRelatedLabels();
</script>
</div></b:if>

8. Save and DONE!


Customization :

You can change the number of maximum related posts being dispalyed for each label.  Find this code max-results=5, changee '5' to your desired related post value.


source : WidgetForFree

Saturday, December 11, 2010

How To Put Google Adsense Under Post Title in Blogger


Many website including Pro site which had a Google Adsense ads place their code under Post title. You wanna do so? It's easy. Follow this steps :

1. Go to your Dashboard > Edit HTML > Check Expand Widget Templates.

2. Find this code :
<data:post.body/>

3.  Paste this code above it :
&lt;b:if cond=&#39;data:blog.pageType == &amp;quot;item&amp;quot;&#39;&gt;
PUT YOUR PARSED ADSENSE CODE HERE
&lt;/b:if&gt;

4. But, you need to parse your Google Adsense code. You can use this parser called "Postable" by Elliot Swan. 

Parse your Adsense Code HERE


5. Save your template. DONE!

Friday, December 10, 2010

How To Remove "Subscribe to: Posts (Atom)" in Blogger


Want to get rid from Subscribe to: Posts (Atom) link at the bottom of your post entry? You can remove it by follow this step. Only 3 steps :

1. As usual, go to your Dashboard > Design > Edit HTML > Check Expand your Widget Templates.

2. Find this code, and delete it :
<b:include data='feedLinks' name='feedLinksBody'/>

3. Save your template. DONE!


GOOD LUCK! :D

Thursday, December 9, 2010

How To Create Text Box in Blogger


Do you want to add text box in blogger? Do you mean like this one?


You can use this code. Just follow this steps. Simple and easy.

Text Box without "Select All" hack.

Use this code :
<textarea rows="5" cols="40" onclick=%u201Djavascript:select()readonly;%u201D>
TEXT
</textarea>


* Change Rows and Cols/column as you like.


Text Box with "Select All" hack.

When you hover your cursor in the text box, it will automatically "Select All" the text in that text box. Use this code :
<form>
<textarea rows="5" cols="40" onClick=select() readonly>This is some text.</textarea>


* Change Rows and Cols/column as you like.


NOTE : To apply this hack, you need to edit it on Edit HTML section not Compose.


DONE! 


Good Luck! :)


Followers

Sponsor

 
Powered by Blogger.