Click on the image above for 10 Reasons to earn money with Fanbox. It's awesome. Fanbox is the best.
+ Any question? Leave your comment. (^_^)

With this widget, you can show your visitor ip address, operating system, browser, and country. This is cool widget to make your visitor know what is their ip address and some other information. Let's add it.
STEPS
<!--Ip Address Widget Starts--><span style="display: block; text-align: center;"><a href="http://all-blogger-tools.blogspot.com/"><img alt="IP widget" border="0" height="125" src="http://www.wieistmeineip.de/ip-address/" width="125" /></a><br /> </span><!--Ip Address Widget Ends-->

<b:section class='sidebar' id='sidebar' preferred='yes'>
<b:widget id='Label99' locked='false' title='Labels' type='Label'><b:includable id='main'><b:if cond='data:title'><h2><data:title/></h2></b:if><div class='widget-content'><script src='http://halotemplates.s3.amazonaws.com/wp-cumulus-example/swfobject.js' type='text/javascript'/><div id='flashcontent'></div><script type='text/javascript'>var so = new SWFObject("http://halotemplates.s3.amazonaws.com/wp-cumulus-example/tagcloud.swf", "tagcloud", "240", "300", "7", "#ffffff");// uncomment next line to enable transparency//so.addParam("wmode", "transparent");so.addVariable("tcolor", "0x333333");so.addVariable("mode", "tags");so.addVariable("distr", "true");so.addVariable("tspeed", "100");so.addVariable("tagcloud", "<tags><b:loop values='data:labels' var='label'><a expr:href='data:label.url' style='12'><data:label.name/></a></b:loop></tags>");so.addParam("allowScriptAccess", "always");so.write("flashcontent");</script><b:include name='quickedit'/></div></b:includable></b:widget>

<meta content='noimageindex' name='robots'/>
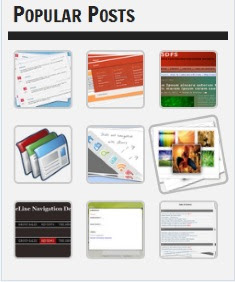
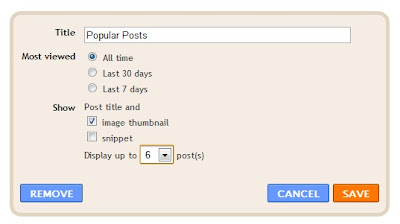
<style type='text/css'>Note: Make sure you add Popular Posts widget to your blogger sidebar.
.PopularPosts ul li {background: none repeat scroll 0 0 transparent;float: left;list-style: none outside none;margin: 5px !important;padding: 0 !important;}
.PopularPosts ul li img {padding:0;-moz-border-radius: 5px;-webkit-border-radius: 5px;border-radius: 5px;-webkit-transition: all 0.3s ease;-moz-transition: all 0.3s ease;transition: all 0.3s ease;border: 2px solid #CCC;height: 80px;width: 80px;}
.PopularPosts ul li img:hover {border:2px solid #BBB;-moz-transform: scale(1.2) rotate(-1090deg) ;-webkit-transform: scale(1.2) rotate(-1090deg) ;-o-transform: scale(1.2) rotate(-1090deg) ;-ms-transform: scale(1.2) rotate(-1090deg) ;transform: scale(1.2) rotate(-1090deg) ;}
</style>