Showing posts with label Blogger Tutorial. Show all posts

Friday, November 30, 2012

Get Latest News For Blogging Idea with Google Alert

Sometimes we do not have an idea to write on the blog. Here we will teach you several ways to get ideas and the latest news from the internet. This service is free without any charges. There are also services that require payment.

Ideas and latest news to make your blog content always updated and more attracted by readers of your blog. Here it is:

GOOGLE ALERTS
http://www.google.com/alerts/

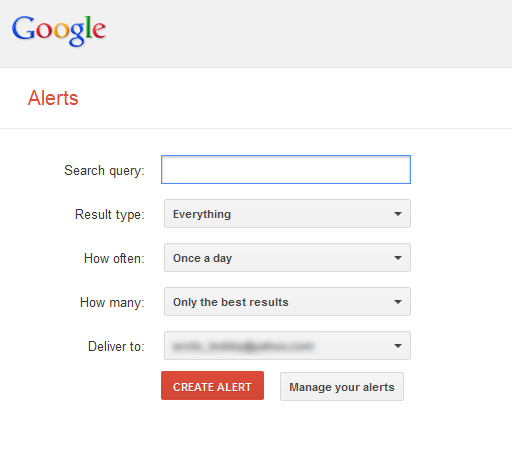
Google Alerts is the best way to track the progress of the topic you're writing on a blog. Google will send you e-mail notifications about articles and the latest news on the internet based on your keywords.

Enter your keywords and click [Create Alert]. Google will send an e-mail notification to you depend on your settings. When you choose once a day, Google will send alerts via e-mail to you every day.


That's it! Use Google Alerts to get the latest news and ideas to produce fresh entries to your blog. Enjoy!

Tuesday, January 24, 2012

How To Hide Facebook Fan Page at the Sidebar in Blogger

Usually, you will find a Facebook fan page at the sidebar or footer. Now can hide your Facebook Fan Page widget. Wonder how? Look at the demo.

DEMO

LET'S ADD IT
1. Go To Dashboard >> Design ->> Edit HTML

2. Check the "Expand Widget Templates" box

3. Search (Ctrl+F) for </head> tag,


4. Then, copy and paste the code below, BEFORE </head> tag,
<script src='https://ajax.googleapis.com/ajax/libs/jquery/1.6.1/jquery.min.js' type='text/javascript'/>
*If you already have the code in your template, just ignore step no 4.

5.  Save your template.

6. Now go to your Dashboard >> Design >> Page Element >> Add a Gadget.


7. Paste this code in.
<script type="text/javascript">
//<!--
$(document).ready(function() {$(".w2bslikebox").hover(function() {$(this).stop().animate({right: "0"}, "medium");}, function() {$(this).stop().animate({right: "-250"}, "medium");}, 500);});
//-->
</script>
<style type="text/css">
.w2bslikebox{background: url("https://blogger.googleusercontent.com/img/b/R29vZ2xl/AVvXsEiL3O4XaE3ZlfgjFSwFLYHvUoyVVwnva4thailpgPvioSobFYq-Pp_-fMzkWGvze-xaWkbt7PfvWAg4R_RNreI3v4daSLYExxuznsmz9zOSyqV0vvYPYOiMrxkVn9t4bJ9LiuKSWHZGCEw/s150/HHLab_facebookbadgeBlue.png") no-repeat scroll left center transparent !important;display: block;float: right;height: 270px;padding: 0 5px 0 46px;width: 245px;z-index: 99999;position:fixed;right:-250px;top:20%;}
.w2bslikebox div{border:none;position:relative;display:block;}
.w2bslikebox span{bottom: 12px;font: 8px "lucida grande",tahoma,verdana,arial,sans-serif;position: absolute;right: 6px;text-align: right;z-index: 99999;}
.w2bslikebox span a{color: #808080;text-decoration:none;}
.w2bslikebox span a:hover{text-decoration:underline;}
</style><div class="w2bslikebox" style=""><div>

<iframe src="http://www.facebook.com/plugins/likebox.php?href=YOUR FAN PAGE URL&amp;width=245&amp;colorscheme=light&amp;show_faces=true&amp;connections=9&amp;stream=false&amp;header=false&amp;height=330" scrolling="no" frameborder="0" style="border: medium none; overflow: hidden; height: 330px; width: 245px;background:#fff;"></iframe></div></div>
*YOUR FAN PAGE URL = Put your Facebook Fan Page URL

8. You can change the facebook logo with another color given below, or use your own image.


GREEN: https://blogger.googleusercontent.com/img/b/R29vZ2xl/AVvXsEggzd43z5UGniAsRmu3IFcwsSl_cXMnlCAy3FNtdsDnALObLLYecFpUt5GfH-Z0N6QaxKYZ-mUuWB-sbvkaleiYpzBajxYB6V2DwlOuINHWrEnoEhq1MEUwsCvtEdDFpaAR0N1UFuOZn2w/s150/crb_facebookbadge.png

PINK: https://blogger.googleusercontent.com/img/b/R29vZ2xl/AVvXsEhO8sx2T34DIC4BBYqPddr6FbQH0ttA_kbFKgT0U09YjD0GVKpd_KIGp3J8K_LBM2yoT1veNxpjR4DhtVYLOyk5fjPXg1Y3_0Q4Xm4OHRFh_GjXpG1AQsX_nrjzDnOPrB3_3IjUwKBVTh8/s150/mhw_facebookbadge.png

9. Save. You're done.

Refresh your blog to see the result. =)

+ Leave your comment.

Sunday, January 22, 2012

How To Integrate Facebook Comment Box in Blogger

Recently Facebook has launched many social plugins and web developers for bloggers. Their much improved Facebook comment box. Facebook comment box is one of the useful tool for bloggers to increase conversations. So, if you interested to integrate Facebook comment box on your blog and change blogger comment into Facebook comment box? This entry is just exact for you. Let's do it.

Note : Before make any changes, back up your template.

1. Visit Facebook Developer Page. Enter your blog name, URL and click on Create application.


2. After that, copy the APP ID.


3. Then, go to Edit Setting


4. If you using blogspot, follow below instruction,


5. But if you using other domain like .com, follow instruction below,


6. Save your App.


ADD FACEBOOK COMMENT BOX

1. Go To Blogger >> Design ->> Edit HTML

2. Check the "Expand Widget Templates" box


3. Search for <html and just after it add this code,

xmlns:fb='http://www.facebook.com/2008/fbml'

4. Now search (Ctrl+F) for,
<body>

5. Just after it, add the below code,
<div id='fb-root'/>
<script>
    window.fbAsyncInit = function() {
    FB.init({
      appId  : &#39;YOUR_APP_ID&#39;,
      status : true, // check login status
        cookie : true, // enable cookies to allow the server to access the   session
      xfbml  : true  // parse XFBML
    });
  };
    (function() {
    var e = document.createElement(&#39;script&#39;);
      e.src = document.location.protocol     &#39;//connect.facebook.net/en_US/all.js&#39;;
    e.async = true;
      document.getElementById(&#39;fb-root&#39;).appendChild(e);
    }());
</script>

6. Change YOUR_APP_ID with your App ID number.

7. And then, search (Ctrl+F) </head> and just above it paste the below code,
<meta expr:content='data:blog.pageTitle' property='og:title'/>
<meta expr:content='data:blog.url' property='og:url'/>
<meta content='YOUR BLOG NAME' property='og:site_name'/>
<meta content='BLOG-LOGO-IMAGE-LINK' property='og:image'/>
<meta content='YOUR_APP_ID' property='fb:app_id'/>
<meta content='http://www.facebook.com/YOUR _FACEBOOK_USERNAME' property='fb:admins'/>
<meta content='article' property='og:type'/>

Replace the red code with your details.

8. Now, search (Ctrl+F) for this ;
<b:includable id='comment-form' var='post'>

9. After it paste the code given below,
<b:if cond='data:blog.pageType == &quot;item&quot;'>
<div style='padding:0px 0px 0px 0px; margin:0px 0px 0px 0px;'><script src='http://connect.facebook.net/en_US/all.js#xfbml=1'/>
<div> <fb:comments  colorscheme='light' expr:href='data:post.url' expr:title='data:post.title' expr:xid='data:post.id' width='520'/></div>
</div>
</b:if>

If you want to use the dark scheme replace light with dark

To change the comments box width, change this value width='520'

#UPDATE
10. Search (Ctrl+F) <fb:comments

11. Replace it with,
<script src='http://connect.facebook.net/en_US/all.js#xfbml=1'/> <fb:comments migrated='1'
12. Save your template.


HIDE BLOGGER COMMENT

Now you need to hide default blogger commenting system. So navigate to Settings > Comments and select hide and save settings.


DONE! See the result.

With this, your previous blogger comment will be hidden.


Do you like it? Recommend it!

Saturday, January 21, 2012

How To Enable Threaded Comment in Blogger Custom Template

Recently, blogger had update new feature which is threaded comment. If you use template from blogger you will see your blogger comment in threaded style. So, if you want to add threaded comment in costume template, just follow this instruction.


APPLY THREADED COMMENT IN COSTUME TEMPLATE
1. Go to Dashboard ->> Layout ->> Edit HTML

2. Search this code (Ctrl + F),
<b:if cond='data:blog.pageType == &quot;item&quot;'>
  <b:include data='post' name='comments'/>
</b:if> 
#maybe this code will appear twice.

3.Replace it with this code,
<b:if cond='data:blog.pageType == &quot;static_page&quot;'>
<b:if cond='data:post.showThreadedComments'>
<b:include data='post' name='threaded_comments'/>
<b:else/>
<b:include data='post' name='comments'/>
</b:if>
</b:if>
<b:if cond='data:blog.pageType == &quot;item&quot;'>
<b:if cond='data:post.showThreadedComments'>
<b:include data='post' name='threaded_comments'/>
<b:else/>
<b:include data='post' name='comments'/>
</b:if>
</b:if>
#so replace the provided code twice.

4. Customize your threaded comment, search (Ctrl+F) this tag,

<b:includable id='threaded_comment_css'>
.
.
.
.
until </b:includable>

6. And then replace it with  this CSS [click].

7. Save your template. Refresh your blog to see the result.

Any problem, just leave your comment. :)

Add Recent Comment with Avatar Widget in Blogger

Recent Comments widget with Avatar for Blogger. Recently Blogger updated the Comments API for Threaded Comments on Blogger . That's how the Avatar of Commenter showed using the updated the Comments API. HOW-TO HOUSE also use this widget. Let's know how.


HOW TO INSTALL
1. Go to your Dashboard >> Design >> Page Element >> Add a Gadget.


2. Paste this code in.
<style type="text/css">
    ul.w2b_recent_comments{list-style:none;margin:0;padding:0;}
    .w2b_recent_comments li{background:none !important;margin:0 0 6px !important;padding:0 0 6px 0 !important;display:block;clear:both;overflow:hidden;list-style:none;}
    .w2b_recent_comments li .avatarImage{padding:3px;background:#fefefe;-webkit-box-shadow:0 1px 1px #ccc;-moz-box-shadow:0 1px 1px #ccc;box-shadow:0 1px 1px #ccc;float:left;margin:0 6px 0 0;position:relative;overflow:hidden;}
    .avatarRound{-webkit-border-radius:100px;-moz-border-radius:100px;border-radius:100px;}
    .w2b_recent_comments li img{padding:0px;position:relative;overflow:hidden;display:block;}
    .w2b_recent_comments li span{margin-top:4px;color: #666;display: block;font-size: 12px;font-style: italic;line-height: 1.4;}
</style>
<script type="text/javascript">
//<![CDATA[
    // Recent Comments Settings
    var
    numComments     = 5,
    showAvatar     = true,
    avatarSize     = 50,
    roundAvatar    = true,
    characters     = 40,
    defaultAvatar     = "http://www.gravatar.com/avatar/?d=mm",
    hideCredits    = false;
//]]>
</script>
<script type="text/javascript" src="http://bloggerblogwidgets.googlecode.com/svn/trunk/w2b-recent-comments-w-gravatar.js"></script>
<script type="text/javascript" src="YOUR BLOG URL/feeds/comments/default?alt=json&callback=w2b_recent_comments&max-results=5"></script>

3. Replace the red code;

numComments     = 5,
• Number of the comment you wanna show

showAvatar     = true,
• set true tor show avatar, false to hide avatar

avatarSize     = 50,
• size px of the avatar

roundAvatar    = true,
true for rounded avatar, false for square avatar

characters     = 40,
• comment word

defaultAvatar     = "http://www.gravatar.com/avatar/?d=mm",
• Change the URL for new default avatar. Leave it if don't feel wanna change it.

YOUR BLOG URL
• Change it to your BLOG URL (necessary)

4. Save it. You're done.

or you can easily use this way2blogging widget generator


Enjoy guys! Leave your comment.

Thursday, January 19, 2012

How To Add jQuery Scroll To Top Widget in Blogger

This widget is made your visitor to easier scroll to top of the page by click on it. It's nice and smooth. It only show up when you scroll the page. I also put this widget in HOW-TO HOUSE. So, let's add it now.

Add the Scroll to top jQuery script

1. Go to Dashboard ->> Design ->>; Edit HTML

2. Search this code (Ctrl + F), </head>

3. Then, paste the code below after </head>
<script src='https://ajax.googleapis.com/ajax/libs/jquery/1.6.1/jquery.min.js' type='text/javascript'/>
<style type='text/css'>#w2btoTop {display:none;text-decoration:none;position:fixed;bottom:10px;right:10px;overflow:hidden;width:51px;height:51px;border:none;text-indent:-999px;background:url(https://blogger.googleusercontent.com/img/b/R29vZ2xl/AVvXsEiA3kSYAOIhjCyyLUPiKjRDS5S5Up39GbMICwRQLwYDV1GYJUGXkdQXQrXloh7_dZFxBNA4g7zqSiHEiqZyDBs7RBySjWbfpL1h6lMDrTJRLEx9RvM86uB9u803uE_MYjfDQAGNTLnM-c03/) no-repeat left top;}#w2btoTopHover {background:url(https://blogger.googleusercontent.com/img/b/R29vZ2xl/AVvXsEiA3kSYAOIhjCyyLUPiKjRDS5S5Up39GbMICwRQLwYDV1GYJUGXkdQXQrXloh7_dZFxBNA4g7zqSiHEiqZyDBs7RBySjWbfpL1h6lMDrTJRLEx9RvM86uB9u803uE_MYjfDQAGNTLnM-c03/) no-repeat left -51px;width:51px;height:51px;display:block;overflow:hidden;float:left;opacity: 0;-moz-opacity: 0;filter:alpha(opacity=0);}#w2btoTop:active, #w2btoTop:focus {outline:none;}</style><script src='http://bloggerblogwidgets.googlecode.com/files/w2b_jquery.ui.totop.js' type='text/javascript'/><script type='text/javascript'>$(document).ready(function(){ $().UItoTop({ easingType: &#39;easeOutCubic&#39; }); }); </script> 

4. Save your template.

Refresh your blog to see the result. Finish!

Friday, December 30, 2011

Add IP Address Widget in Blogger

With this widget, you can show your visitor ip address, operating system, browser, and country. This is cool widget to make your visitor know what is their ip address and some other information. Let's add it.


STEPS

1. Go to your Dashboard >> Design >> Page Element >> Add a Gadget.


2. Paste this code in.
<!--Ip Address Widget Starts--><span style="display: block; text-align: center;"><a href="http://all-blogger-tools.blogspot.com/"><img alt="IP widget" border="0" height="125" src="http://www.wieistmeineip.de/ip-address/" width="125" /></a><br /> </span><!--Ip Address Widget Ends-->

3. Save. Done!

Refresh your blog to see the result.

It will something like this:

IP widget

How To Add Flash Animated Label Tags Cloud in Blogger


Blogger has a Labels tag widget to show your category of entries. This hack will show your labels tag in flash animated. Displaying animated cloud is a cool way of showing your tags in a limited space. Let's do it!

1. Go to Dashboard ->> Design ->> Edit HTML

2. Search this code (Ctrl + F),
<b:section class='sidebar' id='sidebar' preferred='yes'> 

3. Then, paste the code below after <b:section class='sidebar' id='sidebar' preferred='yes'> tag.
 <b:widget id='Label99' locked='false' title='Labels' type='Label'><b:includable id='main'><b:if cond='data:title'><h2><data:title/></h2></b:if><div class='widget-content'><script src='http://halotemplates.s3.amazonaws.com/wp-cumulus-example/swfobject.js' type='text/javascript'/><div id='flashcontent'></div><script type='text/javascript'>var so = new SWFObject(&quot;http://halotemplates.s3.amazonaws.com/wp-cumulus-example/tagcloud.swf&quot;, &quot;tagcloud&quot;, &quot;240&quot;, &quot;300&quot;, &quot;7&quot;, &quot;#ffffff&quot;);// uncomment next line to enable transparency//so.addParam(&quot;wmode&quot;, &quot;transparent&quot;);so.addVariable(&quot;tcolor&quot;, &quot;0x333333&quot;);so.addVariable(&quot;mode&quot;, &quot;tags&quot;);so.addVariable(&quot;distr&quot;, &quot;true&quot;);so.addVariable(&quot;tspeed&quot;, &quot;100&quot;);so.addVariable(&quot;tagcloud&quot;, &quot;<tags><b:loop values='data:labels' var='label'><a expr:href='data:label.url' style='12'><data:label.name/></a></b:loop></tags>&quot;);so.addParam(&quot;allowScriptAccess&quot;, &quot;always&quot;);so.write(&quot;flashcontent&quot;);</script><b:include name='quickedit'/></div></b:includable></b:widget>

4. Save your template.

Refresh your blog to see the result. Finish!

Leave your comment friends! :)

How To Stop Google Photo Indexing in Blogger

You can easily prevent Google from indexing  photo from your blog by doing below steps. Let's know how.

1. Go to Dashboard ->> Layout ->> Edit HTML

2.
Search this code (Ctrl + F), <head>

3. Copy below code and paste it after the
<head> tag .

<meta content='noimageindex' name='robots'/>

4. Save template. Finish.

Yeah!

How To Create Spinning Popular Post Widget in Blogger

Yes. It is very nice effect to have to your Popular Post widget. Whwn you hover your cursor to the Post, the image will zooming anda spinning. You can have it by follow this steps.


SEE DEMO

1. Go to Dashboard ->> Design ->> Edit HTML

2.
Search this code (Ctrl + F), ]]></b:skin>

3. Copy below code and paste it just after
]]></b:skin> tag,
<style type='text/css'>
.PopularPosts ul li {background: none repeat scroll 0 0 transparent;float: left;list-style: none outside none;margin: 5px !important;padding: 0 !important;}
.PopularPosts ul li img {padding:0;-moz-border-radius: 5px;-webkit-border-radius: 5px;border-radius: 5px;-webkit-transition: all 0.3s ease;-moz-transition: all 0.3s ease;transition: all 0.3s ease;border: 2px solid #CCC;height: 80px;width: 80px;}
.PopularPosts ul li img:hover {border:2px solid #BBB;-moz-transform: scale(1.2) rotate(-1090deg) ;-webkit-transform: scale(1.2) rotate(-1090deg) ;-o-transform: scale(1.2) rotate(-1090deg) ;-ms-transform: scale(1.2) rotate(-1090deg) ;transform: scale(1.2) rotate(-1090deg) ;}
</style>
Note: Make sure you add Popular Posts widget to your blogger sidebar. 

4. Now save your template,

5. Edit your Popular Posts widget setting into something like this...


6. Save it.


Refresh your blog to see the result. Cool huh? Good job!


Leave your comment!

Monday, December 26, 2011

How To Create Google Plus Fan Page For Blogger

Google Plus has launch a Google Plus Fan Page. It's similar to Facebook Fan Page. You can use Google Plus Fan Page for business to promote your products, events, etc. This is how to create and add it into your blog.

Create Google + Fan Page
1. First, go to this page, click on the Product or Brand.

2. Enter the Blog Title and URL, select Category

3. Tick the Agree Page Terms check-box and Click on Create Button.

4. Enter the Tagline and Upload a Profile photo.

6. You're page is almost done, click the Share on Google+ button and Finally Click the Finish button.


Add Fan Page Badge to your Blog
Grow your fans or follower by adding this badge to your blog.

1. Go to Get Started page, click the get the Badge link.

2. Choose a Style of Badge and Language (Leave the Advanced options to Default).


3. There is 2 code to add into your blog.
4. Go to Blogger Dashboard > Design > Edit HTML
5. Search for the </head> tag, add the Code #1 section before it.
6. Save your template.
7. Then, add the Code2 section in HTML/JavaScript gadget and place where you want the badge to be appear.

Finish. That's it! Enjoy! Leave your comment yeah!

Saturday, December 10, 2011

How To Change Linkwithin "You might also like" Message in Blooger

Do you have Linkwithin Related post widget? You want to change the Linkwithin message to another message? Sure you can. Only add some code into it. Let's know how.


Add the red code, above your Linkwithin code:
<script>linkwithin_text='YOUR NEW LINKWITHIN MESSAGE :'</script>
YOUR LINKWITHIN CODE

Yeah, that's all you need. Refresh to see the result.

Hope you like it.

Thursday, November 10, 2011

How To Add Scroll For Blog Archive in Blogger

Salam.

Your blog archive is too damn long to the bottom? Do you wanna add a scroll to your blog? Yes, you just to do this few steps to make your blog archive looks like this.


STEPS:
1. Go to your Dashboard >> Design >> Edit HTML >> Check Expand Widget Templates.

2. Search this code (Ctrl + F), ]]></b:skin>

3. Put this code below, after ]]></b:skin>
#BlogArchive1 .widget-content{
height:300px;
width:auto;
overflow:auto;
}

4. You can change the scroll height by edit the code in red:

5. Save. Refresh to see the result.


+ For more tutorial, just see through the labels.

Tuesday, October 25, 2011

How To Make Facebook Like Box Like Wordpress

Wanna have Facebook Like Box like this? Just like in Wordpress. Watch DEMO [click]


You only need to follow this few steps. Let's start.

INSTRUCTION:
1. Go to your Dashboard >> Design >> Page Element >> Add a Gadget.


2. Paste this code in.
<center>
<iframe frameborder="0" href="%0A%0AYOUR FAN PAGE URL%0A%0A" scrolling="no" src="http://www.facebook.com/plugins/fan.php?id=%0A%YOUR FAN PAGE ID%0A%0A&amp;width=292&amp;height=250&amp;connections=25&amp;stream=false&amp;header=false&amp;logobar=false&amp;css=http://howtohouse.googlecode.com/files/fblike.css" style="height: 230px; width: 85%;"></iframe>
<iframe allowtransparency="true" frameborder="0" scrolling="no" src="http://www.facebook.com/plugins/like.php?href=%0A%0AYOUR FAN PAGE URL%0A%0A&amp;send=false&amp;layout=standard&amp;width=292&amp;show_faces=false&amp;action=like&amp;colorscheme=light&amp;font&amp;height=40" style="border: none; height: 40px; overflow: hidden; width: 250px;"></iframe></center>
3. Change:
YOUR FAN PAGE URL- Where to find? Just go to your fan page. Copy URL in the URL bar.


YOUR FAN PAGE ID - On your fan page, click on the Edit Info and copy the ID from the URL bar.


4. Save and FINISH!

Do you like it? ENJOY!

Add Follow and Dashboard Button Like Tumblr in Blogger

Do you like a follow and dashboard button just like in Tumblr? It's look like this;


Live DEMO [click]. Isn't its nice. Let's add it to your blog/site.

STEPS
1. Go to your Dashboard >> Design >> Page Element >> Add a Gadget.


2. Paste this code in.
<div style="display:scroll; position:fixed; top:5px; right:95px;"><a class="linkopacity" href="http://www.blogger.com/follow-blog.g?blogID=YOUR BLOG ID" target="_blank" rel="nofollow" title="Follow" imageanchor="1" style="margin-left: 1em; margin-right: 1em;"><img border="0" src="http://assets.tumblr.com/images/iframe_follow_alpha.png?6" /></a> <div style="display:scroll; position:fixed; top:5px; right:2px;"><a class="linkopacity" href="http://blogger.com/home" target="_blank" rel="nofollow" title="Dashboard" imageanchor="1" style="margin-left: 1em; margin-right: 1em;"><img border="0" src="http://assets.tumblr.com/images/iframe_dashboard_alpha.png?6" /></a></div></div>
3. Change the YOUR BLOG ID with your Blogger. Where to find the ID?

    • Go to Dashboard ->> Design ->> Look at your URL bar.


4. Save and finish.

Enjoy new Tumblr style button.

Sunday, October 16, 2011

How To Disable Image Lightbox in Blogger

Blogger previously has officially launched a lightbox image viewer in Blogger. I had wrote about it in the previous entry. For further info, click here.

But some of the user seems don't like to use it. Want to disable it? Let's know how.

Steps
Log in to Blogger -> Settings | Posts and Comments section (new interface) or the Settings | Formatting section (old interface).

Select “No” next to Lightbox.

• Finish!

Hope you like it!

Spread this entry if you think it's helpful.

Wednesday, October 12, 2011

How To Create Your Own Clock and Add in Blogger

You wanna add some widget like clock. You can do it so. It is good to have a clock in your blog. Time is always important. You can create your own clock and add it into your blog. Let's know how yo.
Let's get started

• Just go this site - click here

• Then, just select between listbox options.

• Customize colors with color pickers.

• Set your clock size with zoom slide.

• Hit the Download button.

• Copy the code and paste in HTML/Javascript

• Finish!

Place the clock on your desire position. Enjoy!

Monday, October 10, 2011

How To Get Email Notification When Someone Submit Form in Google Docs

Assalamualaikum~

In the previous tutorial, we learn to create a free form with Google docs. But some user ask me how to get notify if someone submitted form. We can get notify as soon as possible the form submitted. So, let's know it.

GET EMAIL NOTIFICATION
1. Go to your Google Docs homepage. Click on your form.

2. New tab will be open. Go to Tools tab -> Notification Rules


3. Then, just click on the Any change are made and email - right away.


4. Save. Yes, you done!

After this, if your form submitted, you will get the email notification right away.

Thursday, September 22, 2011

How To Create jQuery Content Slider in Blogger

Do you know what is content slider? It's like a slideshow. You can watch the demo.


Like it? Let's add it.

Steps:
1. Go to your Dashboard >> Design >> Edit HTML >> Check Expand Widget Templates.

2. Search this code (Ctrl + F), ]]></b:skin>

3. Copy below code and paste it just before the ]]></b:skin> tag.
#contentSlide {
border: 1px solid #000;
background:#212421;
height:263px;
padding:10px 0;
}
#slideshow {
margin:0 auto;
width:640px;
height:263px;
background:transparent url(http://lh6.ggpht.com/_dfnTVAxeWMI/SlTPJpS_axI/AAAAAAAABYA/JS60KVWJ9GQ/bg_slideshow.jpg) no-repeat 0 0;
position:relative;
}
#slideshow #slidesContainer {
margin:0 auto;
width:560px;
height:263px;
overflow:auto; /* allow scrollbar */
position:relative;
}
#slideshow #slidesContainer .slide {
margin:0 auto;
width:540px; /* reduce by 20 pixels of #slidesContainer to avoid horizontal scroll */
height:263px;
}
.control {
display:block;
width:39px;
height:263px;
text-indent:-10000px;
position:absolute;
cursor: pointer;
}
#leftControl {
top:0;
left:0;
background:transparent url(http://lh6.ggpht.com/_dfnTVAxeWMI/SlT8KH99FgI/AAAAAAAABZM/e9gXvHjzltU/control_left.jpg) no-repeat 0 0;
}
#rightControl {
top:0;
right:0;
background:transparent url(http://lh6.ggpht.com/_dfnTVAxeWMI/SlT8KMpFpxI/AAAAAAAABZQ/a207Rx0XuiU/control_right.jpg) no-repeat 0 0;
}

.slide h2, .slide p {
margin:15px;
}
.slide h2 {
font:italic 24px Georgia, "Times New Roman", Times, serif;
color:#212421;
letter-spacing:-1px;
}
.slide img {
float:right;
margin:0 15px;
padding: 1px;
background-color: #212421;
border: 1px solid #999;
}

4.  Now, search this code (Ctrl + F), </head>

5.  Copy below code and paste it just before the </head> tag.
<script src='http://ajax.googleapis.com/ajax/libs/jquery/1.3.2/jquery.min.js' type='text/javascript'/>

<script type='text/javascript'>
//<![CDATA[
$(document).ready(function(){var currentPosition=0;var slideWidth=560;var slides=$('.slide');var numberOfSlides=slides.length;$('#slidesContainer').css('overflow','hidden');slides.wrapAll('<div id="slideInner"></div>').css({'float':'left','width':slideWidth});$('#slideInner').css('width',slideWidth*numberOfSlides);$('#slideshow').prepend('<span class="control" id="leftControl">Clicking moves left</span>').append('<span class="control" id="rightControl">Clicking moves right</span>');manageControls(currentPosition);$('.control').bind('click',function(){currentPosition=($(this).attr('id')=='rightControl')?currentPosition 1:currentPosition-1;manageControls(currentPosition);$('#slideInner').animate({'marginLeft':slideWidth*(-currentPosition)})});function manageControls(position){if(position==0){$('#leftControl').hide()}else{$('#leftControl').show()}if(position==numberOfSlides-1){$('#rightControl').hide()}else{$('#rightControl').show()}}
});
//]]>

6. Save your template. Now go to your Dashboard >> Design >> Page Element >> Add a Gadget >> 'HTML/Javascript'.

7.  Add the code below;
<!-- Slideshow HTML START-->
<div id="contentSlide"><div id="slideshow">
<div id="slidesContainer">

<div class="slide">
<h2>CONTENT TITLE</h2>
<p><a href="POST URL"><img alt="" width="215" src="IMAGE URL" height="145"/></a>POST SUMMARY</p>
</div>

<div class="slide">
<h2>CONTENT TITLE</h2>
<p><a href="POST URL"><img alt="" width="215" src="IMAGE URL" height="145"/></a>POST SUMMARY</p>
</div>

<div class="slide">
<h2>CONTENT TITLE</h2>
<p><a href="POST URL"><img alt="" width="215" src="IMAGE URL" height="145"/></a>POST SUMMARY</p>
</div>

<div class="slide">
<h2>CONTENT TITLE</h2>
<p><a href="POST URL"><img alt="" width="215" src="IMAGE URL" height="145"/></a>POST SUMMARY</p>
</div>

<div class="slide">
<h2>CONTENT TITLE</h2>
<p><a href="POST URL"><img alt="" width="215" src="IMAGE URL" height="145"/></a>POST SUMMARY</p>
</div>

</div>
</div></div>
<!-- Slideshow HTML END -->

8.  To add new slideshow, just add this code;
<div class="slide">
<h2>CONTENT TITLE</h2>
<p><a href="POST URL"><img alt="" width="215" src="IMAGE URL" height="145"/></a>POST SUMMARY</p>
</div>

DONE!

Thursday, September 15, 2011

How To Add Colorful Effect For Your Links For Blogger


Let's add some fun to your blog by adding cool effect to your links when your visitors hover it. It’ll be lighting and colorful. It's easy and let's do it.


Steps:
1. Go to your Dashboard >> Design >> Page Element >> Add a Gadget.


2. Paste this code below inside :
<script type='text/javascript'>

 //<![CDATA[

 var rate = 25;

 if (document.getElementById)
  window.onerror=new Function("return true")

 var objActive;  // The object which event occured in
  var act = 0;    // Flag during the action
  var elmH = 0;   // Hue
  var elmS = 128; // Saturation
  var elmV = 255; // Value
  var clrOrg;     // A color before the change
  var TimerID;    // Timer ID

 if (document.all) {
  document.onmouseover = doRainbowAnchor;
  document.onmouseout = stopRainbowAnchor;
  }
  else if (document.getElementById) {
  document.captureEvents(Event.MOUSEOVER | Event.MOUSEOUT);
  document.onmouseover = Mozilla_doRainbowAnchor;
  document.onmouseout = Mozilla_stopRainbowAnchor;
  }

 function doRainbow(obj)
  {
  if (act == 0) {
  act = 1;
  if (obj)
  objActive = obj;
  else
  objActive = event.srcElement;
  clrOrg = objActive.style.color;
  TimerID = setInterval("ChangeColor()",100);
  }
  }


 function stopRainbow()
  {
  if (act) {
  objActive.style.color = clrOrg;
  clearInterval(TimerID);
  act = 0;
  }
  }


 function doRainbowAnchor()
  {
  if (act == 0) {
  var obj = event.srcElement;
  while (obj.tagName != 'A' && obj.tagName != 'BODY') {
  obj = obj.parentElement;
  if (obj.tagName == 'A' || obj.tagName == 'BODY')
  break;
  }

 if (obj.tagName == 'A' && obj.href != '') {
  objActive = obj;
  act = 1;
  clrOrg = objActive.style.color;
  TimerID = setInterval("ChangeColor()",100);
  }
  }
  }


 function stopRainbowAnchor()
  {
  if (act) {
  if (objActive.tagName == 'A') {
  objActive.style.color = clrOrg;
  clearInterval(TimerID);
  act = 0;
  }
  }
  }


 function Mozilla_doRainbowAnchor(e)
  {
  if (act == 0) {
  obj = e.target;
  while (obj.nodeName != 'A' && obj.nodeName != 'BODY') {
  obj = obj.parentNode;
  if (obj.nodeName == 'A' || obj.nodeName == 'BODY')
  break;
  }

 if (obj.nodeName == 'A' && obj.href != '') {
  objActive = obj;
  act = 1;
  clrOrg = obj.style.color;
  TimerID = setInterval("ChangeColor()",100);
  }
  }
  }


 function Mozilla_stopRainbowAnchor(e)
  {
  if (act) {
  if (objActive.nodeName == 'A') {
  objActive.style.color = clrOrg;
  clearInterval(TimerID);
  act = 0;
  }
  }
  }


 function ChangeColor()
  {
  objActive.style.color = makeColor();
  }


 function makeColor()
  {
  // Don't you think Color Gamut to look like Rainbow?

 // HSVtoRGB
  if (elmS == 0) {
  elmR = elmV;    elmG = elmV;    elmB = elmV;
  }
  else {
  t1 = elmV;
  t2 = (255 - elmS) * elmV / 255;
  t3 = elmH % 60;
  t3 = (t1 - t2) * t3 / 60;

 if (elmH < 60) {
  elmR = t1;  elmB = t2;  elmG = t2   t3;
  }
  else if (elmH < 120) {
  elmG = t1;  elmB = t2;  elmR = t1 - t3;
  }
  else if (elmH < 180) {
  elmG = t1;  elmR = t2;  elmB = t2   t3;
  }
  else if (elmH < 240) {
  elmB = t1;  elmR = t2;  elmG = t1 - t3;
  }
  else if (elmH < 300) {
  elmB = t1;  elmG = t2;  elmR = t2   t3;
  }
  else if (elmH < 360) {
  elmR = t1;  elmG = t2;  elmB = t1 - t3;
  }
  else {
  elmR = 0;   elmG = 0;   elmB = 0;
  }
  }

 elmR = Math.floor(elmR).toString(16);
  elmG = Math.floor(elmG).toString(16);
  elmB = Math.floor(elmB).toString(16);
  if (elmR.length == 1)    elmR = "0"   elmR;
  if (elmG.length == 1)    elmG = "0"   elmG;
  if (elmB.length == 1)    elmB = "0"   elmB;

 elmH = elmH   rate;
  if (elmH >= 360)
  elmH = 0;

 return '#'   elmR   elmG   elmB;
  }

 //]]>

 </script>

3. Save it. Done!
You can change;
var rate = 25;
The code is to control the speed of color transformation by increasing or decreasing the number.

Cheers! 


Followers

Sponsor

 
Powered by Blogger.