Friday, November 30, 2012

Get Latest News For Blogging Idea with Google Alert

Sometimes we do not have an idea to write on the blog. Here we will teach you several ways to get ideas and the latest news from the internet. This service is free without any charges. There are also services that require payment.

Ideas and latest news to make your blog content always updated and more attracted by readers of your blog. Here it is:

GOOGLE ALERTS
http://www.google.com/alerts/

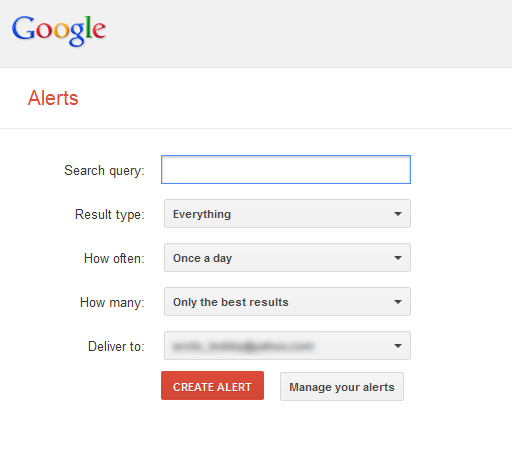
Google Alerts is the best way to track the progress of the topic you're writing on a blog. Google will send you e-mail notifications about articles and the latest news on the internet based on your keywords.

Enter your keywords and click [Create Alert]. Google will send an e-mail notification to you depend on your settings. When you choose once a day, Google will send alerts via e-mail to you every day.


That's it! Use Google Alerts to get the latest news and ideas to produce fresh entries to your blog. Enjoy!

Monday, November 26, 2012

Scan URL wether it is safe or not

Some of URL link in the internet are not safe because of viruses, worms, malware or anything, you name it. Before you are stuck with an insecure link, it's better scan before clicking on the link URL. You can scan these suspicious links before you click on them. 

URLVoid 
URLVoid is a free link service to scan any suspicious URL. Just go to the website, and paste your URL there, and it will tell you whether it is safe or not.


Stay calm & happy browsing! :)

Saturday, September 22, 2012

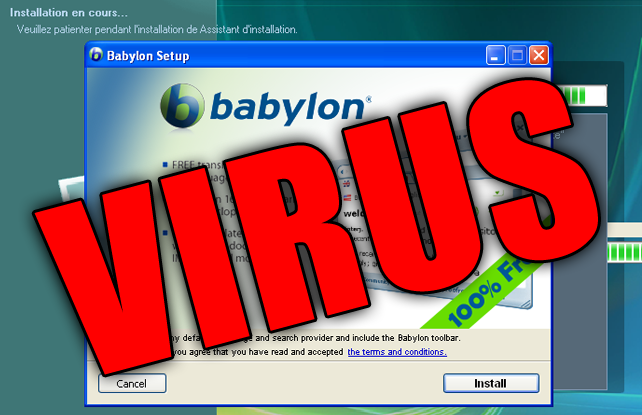
How To Get Rid of Babylon Search

Do you have problem with Babylon search with your Mozilla Firefox? That was extremely annoying. So, let's get rid of it quickly. This is the most worked way to remove it.


STEPS

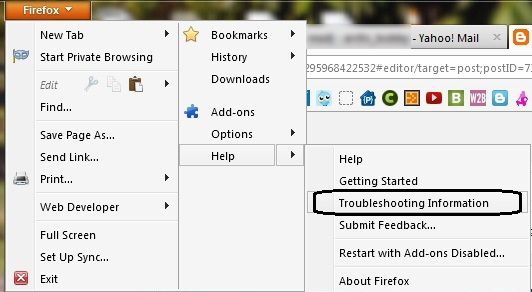
1. Go to Firefox tab -> Help -> Troubleshooting Information


2. Then, click on the "Reset Firefox"


3. Firefox will restart and will work perfectly after that.

Bye bye Babylon. :P

Leave your comment as appreciation.  :D

Sunday, June 3, 2012

How To Download Youtube Video via Keepvid

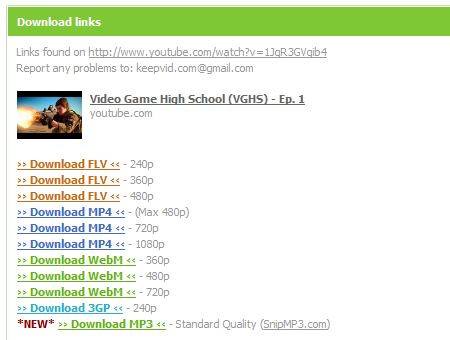
Youtube now available in HD. If you find it's hard to watch the HD video cause it's stuck when buffering? The only way to watch it smoothly by downloading it and play it with your media player. Actually you can download any video on your browser using IDM because it has a video grabber. But if you find it is difficult, just learn this easy way. Download Youtube video via Keepvid.

1. Go to the Youtube video that you want to download.

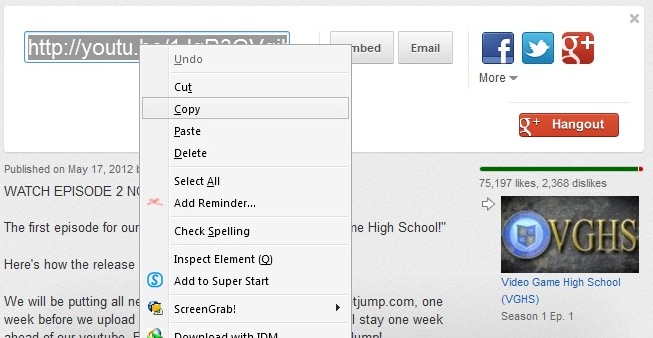
2. Then, copy the video URL;


3. Now, go to Keepvid.com

4. Paste the video URL in the download box provided and click 'DOWNLOAD'


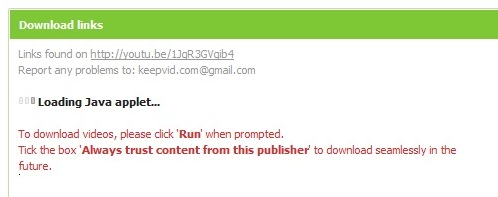
5. Click 'Run' when prompted. Tick the box 'Always trust content from thjis publisher' to start download.


6. Now, you good to download. Success!


Enjoy!

Friday, June 1, 2012

How To Create Screenshot with Media Player Classic (MPC)

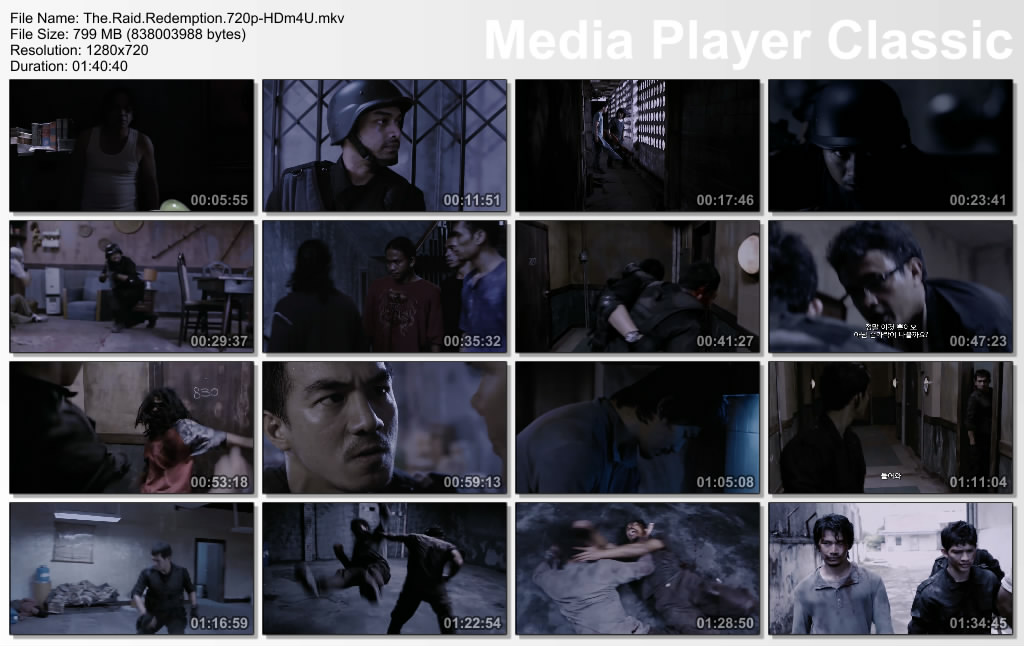
Have you seen screenshot like this?


You wanna create it yourself? It's easy. Just using your Media Player Classic. Easily follow this steps.

1. Of course you need to have Media Player Classic (MPC). Download it here.

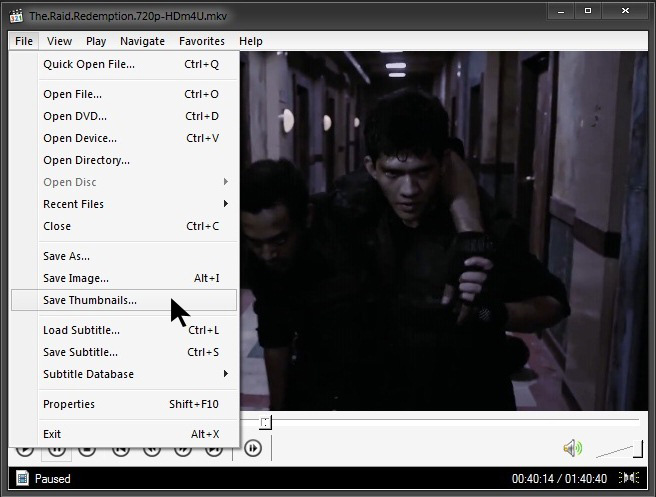
2. Play any movie that you want to take a screenshot. Then, go to File tab --> Save Thumbnails


3. Then, you can customize the amount of thumbnails, columns or image width. Don't forget to set directory where you want to save the screenshot.


4. When you finish customizing, just click Save.

Finish!

You can create a screenshot of any film with MPC. Have a nice day! =)

Thursday, May 24, 2012

How To Fix Multiple Networks at Startup But No Internet Access

Can't connect to the internet because it's showing as being connected to multiple networks? A Home network and an Unidentified network.  When you facing this problem, just follow this tutorial.

Apparently there is an Apple program called "Bonjour Services" it is installed in Windows 7 with programs like iTunes. It is also installed with Adobe PS3 programs but usually shows up as ##Id_String1.6844F930_1628_4223_B5CC_5BB94B879762## in Adobe.

To see if you have the Bonjour service or ##Id_String1.6844F930_1628_4223_B5CC_5BB94B879762## running on your PC.

1. Click Start Right-click "Computer" and select "Manage".
2. Expand "Services and Applications" -> "Services".
3. Find the Bonjour name or ##Id_String1.6844F930_1628_4223_B5CC_5BB94B879762## in the list of services.
4. Double-click this to open up a Window.
5. Under the General Tab next to Start-up Type Select Disabled from the drop down.
6. Finish!

Now test and see if you still have connectivity issues. Good luck!


credit: w7forum.com

Thursday, May 17, 2012

How To Block Annoying Youtube Video Ads

This advertisement is so annoying because disturbing our passion to watch the video and need to wait for a few second. Actually, it took only 8-10 second before you can skip the ads. But if you wish to block the ads, this is for you.

For FIREFOX user:
Install AdBlock Video add-on HERE. Click the icon to turn ON/OFF Adblock Video.

ON: 
OFF:

Works for popular sites like CBS, ABC, NBC, Fox, and others!

Blocks repetitive and annoying ads, allowing you to enjoy your favorite shows without unnecessary interruptions!


For CHROME user:

Install this extension -  Skip ads on YouTube – No illegal block


*****

Now, no more ads. Enjoy! Share it to your friends!
Sunday, April 15, 2012

How To Bypass Adf.ly Links in Google Chrome

In the previously, we shared tutorial to bypass shortening service links such Adf.ly in Mozilla Firefox browser. Now, you can bypass Adf.ly links in Google Chrome too. Hey, why don't you register with Adf.ly? You can earn money by shrink your links. Register with Adf.ly here. And if someone use this method to bypass Adf.ly links, it still be count into your Adf.ly account. :D

STEPS:
1. Install this add-on for Chrome - Click here


2. Done! You can try it by go to this see if it's work. - http://adf.ly/7QKm3

Now, you don't need to wait 5 second and click on the "Skip Ad". It will redirect you to targeted link. Enjoy!
Saturday, April 14, 2012

How To Bypass Adf.ly, AdFoc, Ityim, Linkbucks Etc Links in Mozilla Firefox

As we know, Adf.ly is one of the most popular shortening link service which chosen by user all around the world to earn some money. Undoubtedly it is really good to earn monthly income for me as user of Adf.ly service. I highly recommend you to register with Adf.ly. Read this guide to register with Adf.ly.

But visitors hate this shortening link because have to wait for some time before redirect to the actual link. Also have to click on skip ad button. Now you can bypass links from shortening service such as Adf.ly, AdFoc, ityim, linkbucks, urlcash, adcraft etc in Firefox browser. Let's know how!

STEPS:
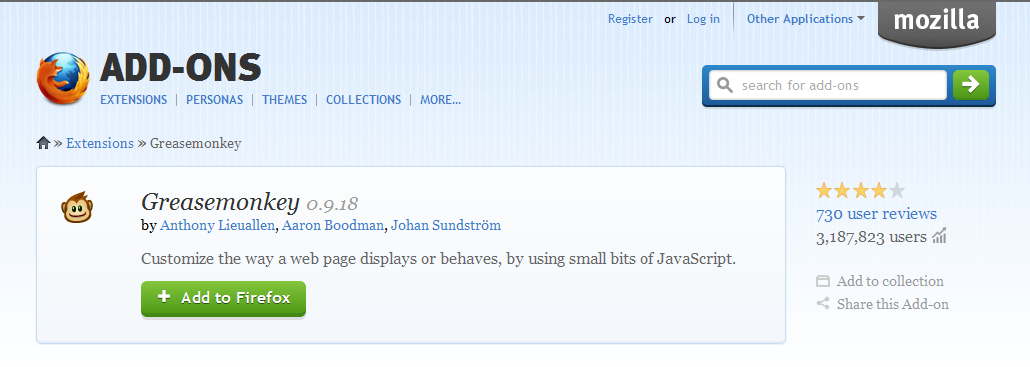
1. Install Greasemonkey add-on. Click here.


2. After that, install user script which is script to bypass those shortening link service.

3. Install AdsFight! userscript for Greasemonkey, Click here. (click Install on the right of the page)

Now you've done. You can try if it's work by click this links --> http://adf.ly/7QKm3


Note: Your Adf.ly links still will be count into your account if someone using this method to bypass your Adf.ly links. Win! :)

Share this tutorial!

Sunday, March 25, 2012

How To Delete Windows.Old Folder

After finished installing you new windows OS, it will leave a folder named as Windows.Old. It is also used a big size of your hard drive. You cannot easily delete it. So, follow this instructions.

STEP TO DELETE WINDOWS.OLD

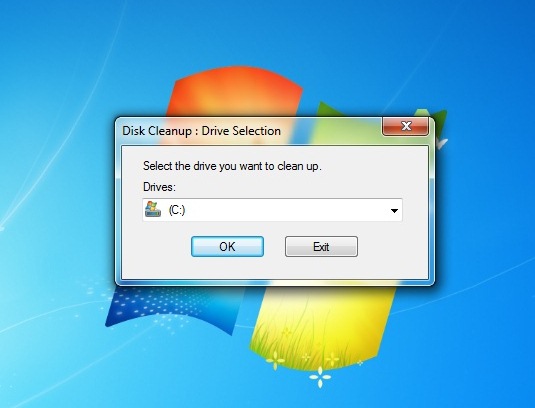
1. Open Disk Cleanup program. Go to Start Menu >> All Programs >> Accessories >> System Tools >> Disk Cleanup


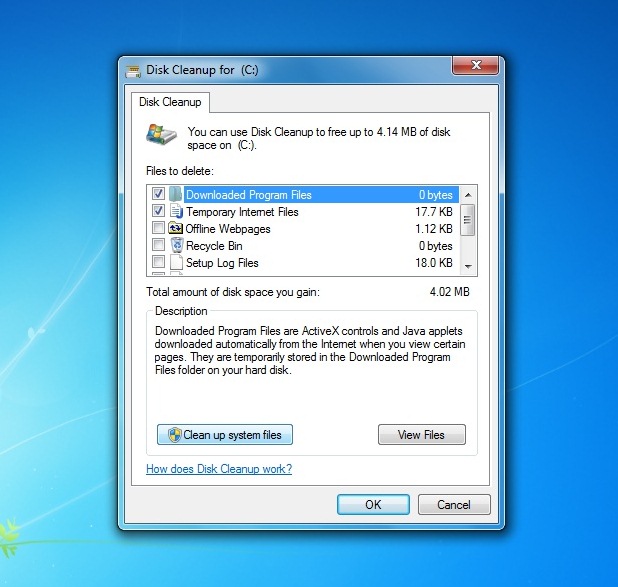
2. Then, click Clean up system files >> Ok


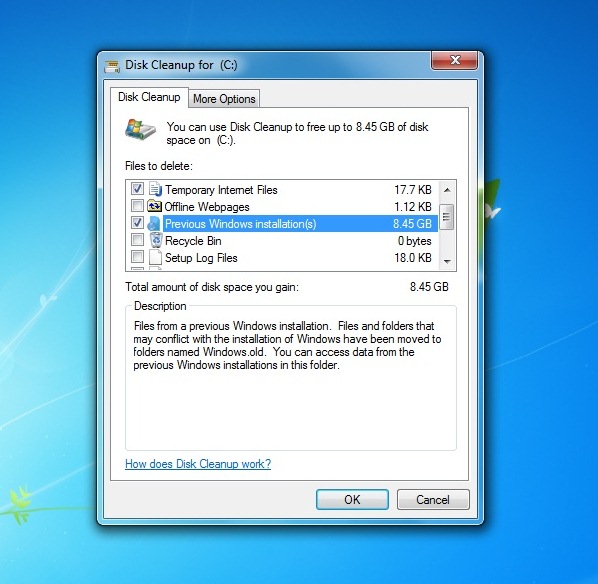
3. After that, check Previous Windows Installation(s), then click Ok.


4. Just wait til' finish.

Now, folder Windows.Old is deleted. :)

Saturday, February 18, 2012

How To Change Back .lnk Files to Normal

The .lnk file extension refers to a shortcut link on your computer, not the actual file. This occurs when you upload the document while the file is still open or if you load the file from the Recent Files folder instead of My Documents, My Computer, or the Desktop. 


This problem make you uncomfortable to use your computer. So let's fix it now.

METHOD #1
1. Open the Registry Editor (click Windows + R, type regedit, hit enter).

2. Navigate to this registry branch:

HKEY_CURRENT_USER\Software\Microsoft\Windows\CurrentVersion\Explorer\FileExts\.lnk

3. Find the subkey called User Choice and delete it.

4. Close Registry Editor.

5. Reboot your PC.


or METHOD #2
Just run this tool to fix it automatically;

#Window 7
#Windiws Vista


No more .lnk files. Enjoy guys! =)

Thursday, February 16, 2012

How To Bypass Survey To Continue Download in Most Website

This surveys always annoys user and make us not interested to download the file we want. It kills our interest. The site like sharecash use this surveymethod to earn some money. The surveys is look something like this:


You wanna get rid from this annoying survey? Actually it's really easy to bypass the freakin' survey. Let's know how.

BYPASS SURVEY
All you need to do is DISABLE JAVASCRIPT.

Mozilla - Go to Options ->> Content ->> Uncheck Enable Javascript.


Same goes to other browser. Just DISABLE JAVASCRIPT.

Easy aite! Enjoy your downloads! =)

Tuesday, February 14, 2012

How To Add Photo Zoom in Facebook

New way to view photo in Facebook, just using zoomer add-on. No need to click the photo to view it just hover your cursor to the photo and it will be zoom to 2x size.


With this add-on, shows full image when you hover over a thumbnail or image link. Works with many sites including Amazon.com, deviantART.com, Facebook.com, Flickr.com, Google Images, GMail.com, Google+, Reddit.com, Tumblr.com, Twitter.com, and more. Let's try this add-on. It's supports Chrome & Firefox browser. Get it now!

Add-on for CHROME
Add-on for FiREFOX


HOW TO USE
• Just install the add-on
• Once it finished, restart your browser
• Hover your cursor to any photo in Facebook.

Enjoy! 
Saturday, February 11, 2012

Add Super-Start into Mozilla Firefox

Super-Start also has a very intuitive interface for you to access your favorite web sites, like what SpeedDial or FastDial does. Just like in Google Chrome.


MORE ABOUT SUPER-START
FAQ
How to customize

Add Super-Start to Mozilla - SUPER-START

Enjoy this add-on for more fast browsing experience!  

Change Your Folder To Any Color in Windows Explorer

Windows Explorer is too boring? Folder Colorizer is a nifty little software that add colorize functions to any folders in Windows explorer. Color it up! Assign any color to any folder – just right-click a folder and choose “Colorize”! Supports your own colors, labels and works seamlessly with any version of Windows.


HOW TO APPLY
• Right click on any folders > select Colorize > Yellow, Lawn Green, Red, Blue, Silver, Violet, Sandy Brown or Aquamarine.

• You can also choose other colours that are not enabled by default. You also can pick your own color by select Color...

Folder Colorizer is compatible with Windows XP, Vista and 7. It also works up to Windows 8 Developer Preview.

DOWNLOAD: Folder Colorizer

Credits: Softorino

Tuesday, January 24, 2012

How To Hide Facebook Fan Page at the Sidebar in Blogger

Usually, you will find a Facebook fan page at the sidebar or footer. Now can hide your Facebook Fan Page widget. Wonder how? Look at the demo.

DEMO

LET'S ADD IT
1. Go To Dashboard >> Design ->> Edit HTML

2. Check the "Expand Widget Templates" box

3. Search (Ctrl+F) for </head> tag,


4. Then, copy and paste the code below, BEFORE </head> tag,
<script src='https://ajax.googleapis.com/ajax/libs/jquery/1.6.1/jquery.min.js' type='text/javascript'/>
*If you already have the code in your template, just ignore step no 4.

5.  Save your template.

6. Now go to your Dashboard >> Design >> Page Element >> Add a Gadget.


7. Paste this code in.
<script type="text/javascript">
//<!--
$(document).ready(function() {$(".w2bslikebox").hover(function() {$(this).stop().animate({right: "0"}, "medium");}, function() {$(this).stop().animate({right: "-250"}, "medium");}, 500);});
//-->
</script>
<style type="text/css">
.w2bslikebox{background: url("https://blogger.googleusercontent.com/img/b/R29vZ2xl/AVvXsEiL3O4XaE3ZlfgjFSwFLYHvUoyVVwnva4thailpgPvioSobFYq-Pp_-fMzkWGvze-xaWkbt7PfvWAg4R_RNreI3v4daSLYExxuznsmz9zOSyqV0vvYPYOiMrxkVn9t4bJ9LiuKSWHZGCEw/s150/HHLab_facebookbadgeBlue.png") no-repeat scroll left center transparent !important;display: block;float: right;height: 270px;padding: 0 5px 0 46px;width: 245px;z-index: 99999;position:fixed;right:-250px;top:20%;}
.w2bslikebox div{border:none;position:relative;display:block;}
.w2bslikebox span{bottom: 12px;font: 8px "lucida grande",tahoma,verdana,arial,sans-serif;position: absolute;right: 6px;text-align: right;z-index: 99999;}
.w2bslikebox span a{color: #808080;text-decoration:none;}
.w2bslikebox span a:hover{text-decoration:underline;}
</style><div class="w2bslikebox" style=""><div>

<iframe src="http://www.facebook.com/plugins/likebox.php?href=YOUR FAN PAGE URL&amp;width=245&amp;colorscheme=light&amp;show_faces=true&amp;connections=9&amp;stream=false&amp;header=false&amp;height=330" scrolling="no" frameborder="0" style="border: medium none; overflow: hidden; height: 330px; width: 245px;background:#fff;"></iframe></div></div>
*YOUR FAN PAGE URL = Put your Facebook Fan Page URL

8. You can change the facebook logo with another color given below, or use your own image.


GREEN: https://blogger.googleusercontent.com/img/b/R29vZ2xl/AVvXsEggzd43z5UGniAsRmu3IFcwsSl_cXMnlCAy3FNtdsDnALObLLYecFpUt5GfH-Z0N6QaxKYZ-mUuWB-sbvkaleiYpzBajxYB6V2DwlOuINHWrEnoEhq1MEUwsCvtEdDFpaAR0N1UFuOZn2w/s150/crb_facebookbadge.png

PINK: https://blogger.googleusercontent.com/img/b/R29vZ2xl/AVvXsEhO8sx2T34DIC4BBYqPddr6FbQH0ttA_kbFKgT0U09YjD0GVKpd_KIGp3J8K_LBM2yoT1veNxpjR4DhtVYLOyk5fjPXg1Y3_0Q4Xm4OHRFh_GjXpG1AQsX_nrjzDnOPrB3_3IjUwKBVTh8/s150/mhw_facebookbadge.png

9. Save. You're done.

Refresh your blog to see the result. =)

+ Leave your comment.

Monday, January 23, 2012

How To Unlink Fanbox From Facebook Account

For Fanbox user, if you link your facebook with fanbox. All your activity in Fanbox will be showm in Facebook. Sometimes it's annoying. If you want to unlink Fanbox from Facebook, just simply follow this step.

UNLINK FANBOX FROM FACEBOOK
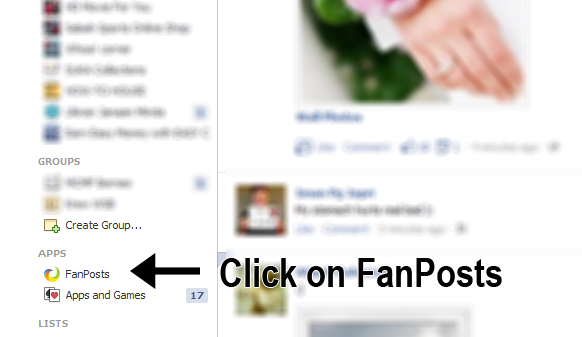
1. In facebook at the left side, under Apps column. Find Fanposts. Click on it.


2. If you can't find it, click "More" button next to Apps. Then, search for Fanposts.


3. Then, just click on "Turn off automatic post".


4. Finish!


Happy blogging! :)

How To Create a Fake PC Virus

Wanna make some fun with your friends? How about create a fake virus and put it their desktop. Wait and see their reaction. LOL.


CODE:
X=MsgBox("Message Description",0+16,"Title")

1. You can write any number from 1,2,3 or 4 instead of 0 (before the '+' symbol) and here is the meaning of these numbers:

0 = OK Button,
1 = OK / Cancel Button,
2 = Abort / Retry / Ignore Button,
3 = Yes / No / Cancel Button,
4 = Yes / No Button,


2. You can write 32 or 48 or 16 instead of 64. Here is the meaning of each number:

16 = Critical Icon,
32 = Help Icon,
48 = Warning Icon,
64 = Information Icon,

Make sure you add ".vbs" after the name.

Finish. Have fun. :)

credit: HatifHammad

Sunday, January 22, 2012

How To Embed Youtube Video in Blogger

This is the simple tutorial for those are new to blogging world. You can embed any video from Youtube  in your blog. You only need to follow this few step.

EMBED YOUTUBE VIDEO IN BLOGGER
1. Go to any Youtube video URL that you want to embed in your blog.

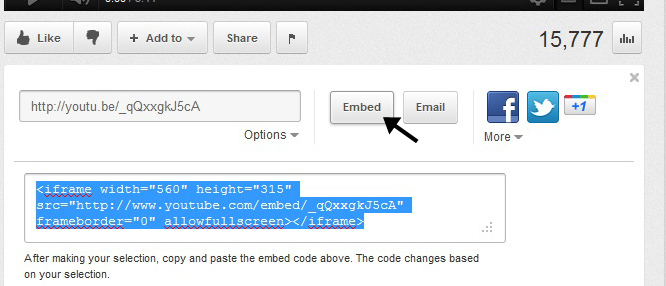
2. Click "Share" button,


3. Click "Embed" and copy the embed code.


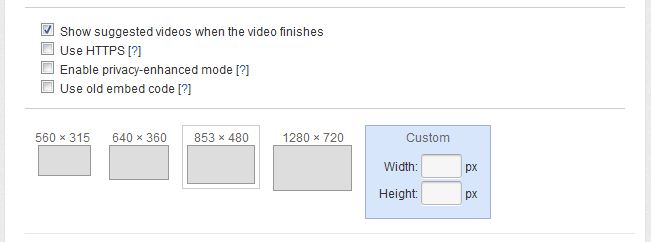
- You also can customize video width and height before you copy the embed code.


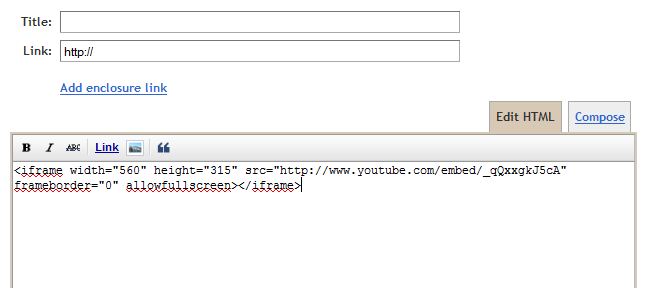
4. Then, go to your post editor area. In Edit HTML section, paste the embed code in. Then go back to Compose section.


5. That's it. Finish!

Now, you can embed any of your favorite video in your blog. Hope you love it! :)

How To Integrate Facebook Comment Box in Blogger

Recently Facebook has launched many social plugins and web developers for bloggers. Their much improved Facebook comment box. Facebook comment box is one of the useful tool for bloggers to increase conversations. So, if you interested to integrate Facebook comment box on your blog and change blogger comment into Facebook comment box? This entry is just exact for you. Let's do it.

Note : Before make any changes, back up your template.

1. Visit Facebook Developer Page. Enter your blog name, URL and click on Create application.


2. After that, copy the APP ID.


3. Then, go to Edit Setting


4. If you using blogspot, follow below instruction,


5. But if you using other domain like .com, follow instruction below,


6. Save your App.


ADD FACEBOOK COMMENT BOX

1. Go To Blogger >> Design ->> Edit HTML

2. Check the "Expand Widget Templates" box


3. Search for <html and just after it add this code,

xmlns:fb='http://www.facebook.com/2008/fbml'

4. Now search (Ctrl+F) for,
<body>

5. Just after it, add the below code,
<div id='fb-root'/>
<script>
    window.fbAsyncInit = function() {
    FB.init({
      appId  : &#39;YOUR_APP_ID&#39;,
      status : true, // check login status
        cookie : true, // enable cookies to allow the server to access the   session
      xfbml  : true  // parse XFBML
    });
  };
    (function() {
    var e = document.createElement(&#39;script&#39;);
      e.src = document.location.protocol     &#39;//connect.facebook.net/en_US/all.js&#39;;
    e.async = true;
      document.getElementById(&#39;fb-root&#39;).appendChild(e);
    }());
</script>

6. Change YOUR_APP_ID with your App ID number.

7. And then, search (Ctrl+F) </head> and just above it paste the below code,
<meta expr:content='data:blog.pageTitle' property='og:title'/>
<meta expr:content='data:blog.url' property='og:url'/>
<meta content='YOUR BLOG NAME' property='og:site_name'/>
<meta content='BLOG-LOGO-IMAGE-LINK' property='og:image'/>
<meta content='YOUR_APP_ID' property='fb:app_id'/>
<meta content='http://www.facebook.com/YOUR _FACEBOOK_USERNAME' property='fb:admins'/>
<meta content='article' property='og:type'/>

Replace the red code with your details.

8. Now, search (Ctrl+F) for this ;
<b:includable id='comment-form' var='post'>

9. After it paste the code given below,
<b:if cond='data:blog.pageType == &quot;item&quot;'>
<div style='padding:0px 0px 0px 0px; margin:0px 0px 0px 0px;'><script src='http://connect.facebook.net/en_US/all.js#xfbml=1'/>
<div> <fb:comments  colorscheme='light' expr:href='data:post.url' expr:title='data:post.title' expr:xid='data:post.id' width='520'/></div>
</div>
</b:if>

If you want to use the dark scheme replace light with dark

To change the comments box width, change this value width='520'

#UPDATE
10. Search (Ctrl+F) <fb:comments

11. Replace it with,
<script src='http://connect.facebook.net/en_US/all.js#xfbml=1'/> <fb:comments migrated='1'
12. Save your template.


HIDE BLOGGER COMMENT

Now you need to hide default blogger commenting system. So navigate to Settings > Comments and select hide and save settings.


DONE! See the result.

With this, your previous blogger comment will be hidden.


Do you like it? Recommend it!

Saturday, January 21, 2012

How To Enable Threaded Comment in Blogger Custom Template

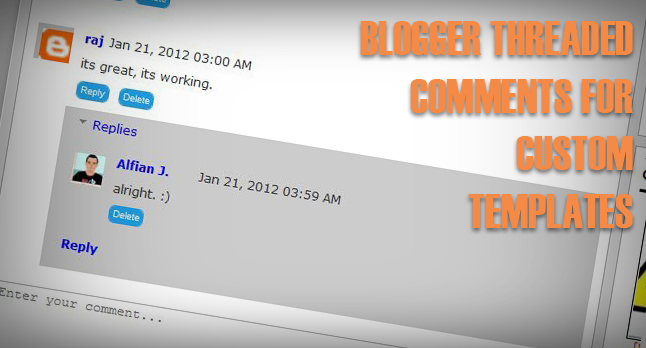
Recently, blogger had update new feature which is threaded comment. If you use template from blogger you will see your blogger comment in threaded style. So, if you want to add threaded comment in costume template, just follow this instruction.


APPLY THREADED COMMENT IN COSTUME TEMPLATE
1. Go to Dashboard ->> Layout ->> Edit HTML

2. Search this code (Ctrl + F),
<b:if cond='data:blog.pageType == &quot;item&quot;'>
  <b:include data='post' name='comments'/>
</b:if> 
#maybe this code will appear twice.

3.Replace it with this code,
<b:if cond='data:blog.pageType == &quot;static_page&quot;'>
<b:if cond='data:post.showThreadedComments'>
<b:include data='post' name='threaded_comments'/>
<b:else/>
<b:include data='post' name='comments'/>
</b:if>
</b:if>
<b:if cond='data:blog.pageType == &quot;item&quot;'>
<b:if cond='data:post.showThreadedComments'>
<b:include data='post' name='threaded_comments'/>
<b:else/>
<b:include data='post' name='comments'/>
</b:if>
</b:if>
#so replace the provided code twice.

4. Customize your threaded comment, search (Ctrl+F) this tag,

<b:includable id='threaded_comment_css'>
.
.
.
.
until </b:includable>

6. And then replace it with  this CSS [click].

7. Save your template. Refresh your blog to see the result.

Any problem, just leave your comment. :)

Add Recent Comment with Avatar Widget in Blogger

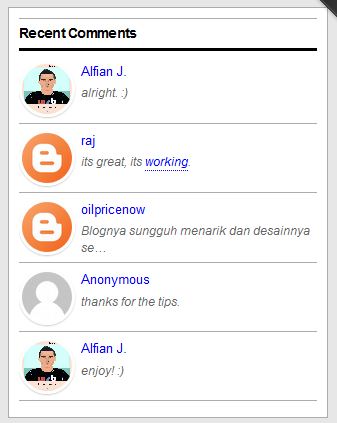
Recent Comments widget with Avatar for Blogger. Recently Blogger updated the Comments API for Threaded Comments on Blogger . That's how the Avatar of Commenter showed using the updated the Comments API. HOW-TO HOUSE also use this widget. Let's know how.


HOW TO INSTALL
1. Go to your Dashboard >> Design >> Page Element >> Add a Gadget.


2. Paste this code in.
<style type="text/css">
    ul.w2b_recent_comments{list-style:none;margin:0;padding:0;}
    .w2b_recent_comments li{background:none !important;margin:0 0 6px !important;padding:0 0 6px 0 !important;display:block;clear:both;overflow:hidden;list-style:none;}
    .w2b_recent_comments li .avatarImage{padding:3px;background:#fefefe;-webkit-box-shadow:0 1px 1px #ccc;-moz-box-shadow:0 1px 1px #ccc;box-shadow:0 1px 1px #ccc;float:left;margin:0 6px 0 0;position:relative;overflow:hidden;}
    .avatarRound{-webkit-border-radius:100px;-moz-border-radius:100px;border-radius:100px;}
    .w2b_recent_comments li img{padding:0px;position:relative;overflow:hidden;display:block;}
    .w2b_recent_comments li span{margin-top:4px;color: #666;display: block;font-size: 12px;font-style: italic;line-height: 1.4;}
</style>
<script type="text/javascript">
//<![CDATA[
    // Recent Comments Settings
    var
    numComments     = 5,
    showAvatar     = true,
    avatarSize     = 50,
    roundAvatar    = true,
    characters     = 40,
    defaultAvatar     = "http://www.gravatar.com/avatar/?d=mm",
    hideCredits    = false;
//]]>
</script>
<script type="text/javascript" src="http://bloggerblogwidgets.googlecode.com/svn/trunk/w2b-recent-comments-w-gravatar.js"></script>
<script type="text/javascript" src="YOUR BLOG URL/feeds/comments/default?alt=json&callback=w2b_recent_comments&max-results=5"></script>

3. Replace the red code;

numComments     = 5,
• Number of the comment you wanna show

showAvatar     = true,
• set true tor show avatar, false to hide avatar

avatarSize     = 50,
• size px of the avatar

roundAvatar    = true,
true for rounded avatar, false for square avatar

characters     = 40,
• comment word

defaultAvatar     = "http://www.gravatar.com/avatar/?d=mm",
• Change the URL for new default avatar. Leave it if don't feel wanna change it.

YOUR BLOG URL
• Change it to your BLOG URL (necessary)

4. Save it. You're done.

or you can easily use this way2blogging widget generator


Enjoy guys! Leave your comment.

Friday, January 20, 2012

How To Create Upside Down Text


Do you want your text upside down on Facebook? Who said writing upside down is difficult? It's really easy as ABC. This is the example:


ǝldɯɐxǝ

HOW TO MAKE UPSIDE DOWN TEXT

1. Go to this site:


2. Type the words that you want to put on Facebook, just copy-paste the word into Facebook.

3. Walla. Just like ABC. Done!

So, you can hide you word from your reader or friend from to be read directly.

How To Add Rollover Social Icons in Blogger

This social icon widget include Facebook, Twitter and RSS. When you hover your cursor into the icon,it will rollover. Now, you can add it to your blog. Let's know how.


STEPS
1. Go to your Dashboard >> Design >> Page Element >> Add a Gadget.


2. Paste this code in.
<center>
<a href=http://www.facebook.com/username target="_blank" onmouseover= "if (document.images) document.facebook.src= 'https://blogger.googleusercontent.com/img/b/R29vZ2xl/AVvXsEhhzQSOIFOjkPP_UraP8xXTmLE74qmnetsIZyI-h7pQmTqBIiOZO-VhY5oWDHK0RYtOEPIazfvh2cQBNjVWV9_yam5uHZHmS_0B0yU6_isjW-2TfUq9pl4f6vkyouPzZn4MipaazHF9kuV5/s1600/facebook.png';" onmouseout= "if (document.images) document.facebook.src= 'https://blogger.googleusercontent.com/img/b/R29vZ2xl/AVvXsEgUywM7lX9ozB5Vpp9-GnipfuH7pD6kCjzgujE3EF1NqyHTOupHhuWLoZWXhTECN67qbRF1FAVeVfS98rkvB45U91I1Bprr7OmyUn9xn0dmMf6WkYgmeQWFMDiV_RSo4qumBWRMnSSoybJe/s1600/facebook.png';"><img src="https://blogger.googleusercontent.com/img/b/R29vZ2xl/AVvXsEgUywM7lX9ozB5Vpp9-GnipfuH7pD6kCjzgujE3EF1NqyHTOupHhuWLoZWXhTECN67qbRF1FAVeVfS98rkvB45U91I1Bprr7OmyUn9xn0dmMf6WkYgmeQWFMDiV_RSo4qumBWRMnSSoybJe/s1600/facebook.png" name="facebook" border="0" width="64" height="82"/></a><a target="_blank" href=http://twitter.com/username onmouseover= "if (document.images) document.twitter.src= 'https://blogger.googleusercontent.com/img/b/R29vZ2xl/AVvXsEjIY0OIPhOtay-fF32zEgB8hL66E_2LJYnEI21COMhV2K72T9wvMHKkZzBXCJOmax7KrHuohg6ldGp_ikt413vH-tkT-i8diA2-UwCcnEXWb_iDr4EIrkkquOM9PTmhoeK_kCxJVJHA0N8X/s320/twitter.png';" onmouseout= "if (document.images) document.twitter.src= 'https://blogger.googleusercontent.com/img/b/R29vZ2xl/AVvXsEhOHEfRCUMME7HM9AB9K9rGVD6lT-gk8Pd-TXIZ7QyIcbAiMk2mqfckgtfAqHmaabVnabABYWWxPTr31uRnkFfkW3kXaMLkQ9c9Dn5IgjHjXo3aQCJRExyDtq0PAiAD4Y3mRiMoIrQ1UbEf/s1600/twitter.png';"><img src="https://blogger.googleusercontent.com/img/b/R29vZ2xl/AVvXsEhOHEfRCUMME7HM9AB9K9rGVD6lT-gk8Pd-TXIZ7QyIcbAiMk2mqfckgtfAqHmaabVnabABYWWxPTr31uRnkFfkW3kXaMLkQ9c9Dn5IgjHjXo3aQCJRExyDtq0PAiAD4Y3mRiMoIrQ1UbEf/s1600/twitter.png" name="twitter" border="0" width="64" height="82"/></a><a href=http://feeds.feedburner.com/username target="_blank" onmouseover= "if (document.images) document.rss.src= 'https://blogger.googleusercontent.com/img/b/R29vZ2xl/AVvXsEhpZMYB8lJ0O4ZPFLkrrBXI4cUdEMK9EcdZjkWzDGX4HXybv42hUZEA0C_JP6Cn0sf0Ry_cbQGfblPIL1uzmQOAtYg1o-v1LDIDk3e9jt-wx54dhJJsGD2BLopFhzLXVHS4S3BQsJetCq3c/s1600/rss.png';" onmouseout= "if (document.images) document.rss.src= 'https://blogger.googleusercontent.com/img/b/R29vZ2xl/AVvXsEihXZzH141zmZlKdpNsb3PLRmQkfaJSRUgAiKdOpeddH8wEcHNdoWXf_AUcNHXm5YewLX6hed5FT1uIs6VNo-6X0j9kE_0FlQzeyI9CCxzqkNdjtm9RP2auEhU99Lfn2pEhVMlfz1ATyzRm/s1600/rss.png';"><img src="https://blogger.googleusercontent.com/img/b/R29vZ2xl/AVvXsEihXZzH141zmZlKdpNsb3PLRmQkfaJSRUgAiKdOpeddH8wEcHNdoWXf_AUcNHXm5YewLX6hed5FT1uIs6VNo-6X0j9kE_0FlQzeyI9CCxzqkNdjtm9RP2auEhU99Lfn2pEhVMlfz1ATyzRm/s1600/rss.png" name="rss" border="0" width="64" height="82"/></a>
</center>

3. Replace the red code with your Facebook, Twitter and RSS URL.

4. Save. Finish! You're done.


Enjoy your rollover social icon guys! :)

Thursday, January 19, 2012

How To Add jQuery Scroll To Top Widget in Blogger

This widget is made your visitor to easier scroll to top of the page by click on it. It's nice and smooth. It only show up when you scroll the page. I also put this widget in HOW-TO HOUSE. So, let's add it now.

Add the Scroll to top jQuery script

1. Go to Dashboard ->> Design ->>; Edit HTML

2. Search this code (Ctrl + F), </head>

3. Then, paste the code below after </head>
<script src='https://ajax.googleapis.com/ajax/libs/jquery/1.6.1/jquery.min.js' type='text/javascript'/>
<style type='text/css'>#w2btoTop {display:none;text-decoration:none;position:fixed;bottom:10px;right:10px;overflow:hidden;width:51px;height:51px;border:none;text-indent:-999px;background:url(https://blogger.googleusercontent.com/img/b/R29vZ2xl/AVvXsEiA3kSYAOIhjCyyLUPiKjRDS5S5Up39GbMICwRQLwYDV1GYJUGXkdQXQrXloh7_dZFxBNA4g7zqSiHEiqZyDBs7RBySjWbfpL1h6lMDrTJRLEx9RvM86uB9u803uE_MYjfDQAGNTLnM-c03/) no-repeat left top;}#w2btoTopHover {background:url(https://blogger.googleusercontent.com/img/b/R29vZ2xl/AVvXsEiA3kSYAOIhjCyyLUPiKjRDS5S5Up39GbMICwRQLwYDV1GYJUGXkdQXQrXloh7_dZFxBNA4g7zqSiHEiqZyDBs7RBySjWbfpL1h6lMDrTJRLEx9RvM86uB9u803uE_MYjfDQAGNTLnM-c03/) no-repeat left -51px;width:51px;height:51px;display:block;overflow:hidden;float:left;opacity: 0;-moz-opacity: 0;filter:alpha(opacity=0);}#w2btoTop:active, #w2btoTop:focus {outline:none;}</style><script src='http://bloggerblogwidgets.googlecode.com/files/w2b_jquery.ui.totop.js' type='text/javascript'/><script type='text/javascript'>$(document).ready(function(){ $().UItoTop({ easingType: &#39;easeOutCubic&#39; }); }); </script> 

4. Save your template.

Refresh your blog to see the result. Finish!

Protest on SOPA: Internet Blackout

The sites which protest against the SOPA (Stop Online Piracy Act). What is SOPA about? Read here. This sites blackout their site. The sites is included Wikipedia, Google, Firefox, Twitpic, Wordpress, Flickr, OpenDNS.


The online SOPA/PIPA protest (internet blackout) ends....for now.

The Wikipedia blackout is over — and you have spoken.

More than 162 million people saw our message asking if you could imagine a world without free knowledge. You said no. You shut down Congress’s switchboards. You melted their servers. From all around the world your messages dominated social media and the news. Millions of people have spoken in defense of a free and open Internet. For us, this is not about money. It’s about knowledge. As a community of authors, editors, photographers, and programmers, we invite everyone to share and build upon our work.

Our mission is to empower and engage people to document the sum of all human knowledge, and to make it available to all humanity, in perpetuity. We care passionately about the rights of authors, because we are authors. SOPA and PIPA are not dead: they are waiting in the shadows. What’s happened in the last 24 hours, though, is extraordinary. The internet has enabled creativity, knowledge, and innovation to shine, and as Wikipedia went dark, you've directed your energy to protecting it.

We’re turning the lights back on. Help us keep them shining brightly.

[source]


Followers

Sponsor

 
Powered by Blogger.