Friday, December 30, 2011

Add IP Address Widget in Blogger

With this widget, you can show your visitor ip address, operating system, browser, and country. This is cool widget to make your visitor know what is their ip address and some other information. Let's add it.


STEPS

1. Go to your Dashboard >> Design >> Page Element >> Add a Gadget.


2. Paste this code in.
<!--Ip Address Widget Starts--><span style="display: block; text-align: center;"><a href="http://all-blogger-tools.blogspot.com/"><img alt="IP widget" border="0" height="125" src="http://www.wieistmeineip.de/ip-address/" width="125" /></a><br /> </span><!--Ip Address Widget Ends-->

3. Save. Done!

Refresh your blog to see the result.

It will something like this:

IP widget

How To Add Flash Animated Label Tags Cloud in Blogger


Blogger has a Labels tag widget to show your category of entries. This hack will show your labels tag in flash animated. Displaying animated cloud is a cool way of showing your tags in a limited space. Let's do it!

1. Go to Dashboard ->> Design ->> Edit HTML

2. Search this code (Ctrl + F),
<b:section class='sidebar' id='sidebar' preferred='yes'> 

3. Then, paste the code below after <b:section class='sidebar' id='sidebar' preferred='yes'> tag.
 <b:widget id='Label99' locked='false' title='Labels' type='Label'><b:includable id='main'><b:if cond='data:title'><h2><data:title/></h2></b:if><div class='widget-content'><script src='http://halotemplates.s3.amazonaws.com/wp-cumulus-example/swfobject.js' type='text/javascript'/><div id='flashcontent'></div><script type='text/javascript'>var so = new SWFObject(&quot;http://halotemplates.s3.amazonaws.com/wp-cumulus-example/tagcloud.swf&quot;, &quot;tagcloud&quot;, &quot;240&quot;, &quot;300&quot;, &quot;7&quot;, &quot;#ffffff&quot;);// uncomment next line to enable transparency//so.addParam(&quot;wmode&quot;, &quot;transparent&quot;);so.addVariable(&quot;tcolor&quot;, &quot;0x333333&quot;);so.addVariable(&quot;mode&quot;, &quot;tags&quot;);so.addVariable(&quot;distr&quot;, &quot;true&quot;);so.addVariable(&quot;tspeed&quot;, &quot;100&quot;);so.addVariable(&quot;tagcloud&quot;, &quot;<tags><b:loop values='data:labels' var='label'><a expr:href='data:label.url' style='12'><data:label.name/></a></b:loop></tags>&quot;);so.addParam(&quot;allowScriptAccess&quot;, &quot;always&quot;);so.write(&quot;flashcontent&quot;);</script><b:include name='quickedit'/></div></b:includable></b:widget>

4. Save your template.

Refresh your blog to see the result. Finish!

Leave your comment friends! :)

How To Stop Google Photo Indexing in Blogger

You can easily prevent Google from indexing  photo from your blog by doing below steps. Let's know how.

1. Go to Dashboard ->> Layout ->> Edit HTML

2.
Search this code (Ctrl + F), <head>

3. Copy below code and paste it after the
<head> tag .

<meta content='noimageindex' name='robots'/>

4. Save template. Finish.

Yeah!

How To Create Spinning Popular Post Widget in Blogger

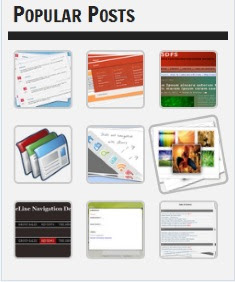
Yes. It is very nice effect to have to your Popular Post widget. Whwn you hover your cursor to the Post, the image will zooming anda spinning. You can have it by follow this steps.


SEE DEMO

1. Go to Dashboard ->> Design ->> Edit HTML

2.
Search this code (Ctrl + F), ]]></b:skin>

3. Copy below code and paste it just after
]]></b:skin> tag,
<style type='text/css'>
.PopularPosts ul li {background: none repeat scroll 0 0 transparent;float: left;list-style: none outside none;margin: 5px !important;padding: 0 !important;}
.PopularPosts ul li img {padding:0;-moz-border-radius: 5px;-webkit-border-radius: 5px;border-radius: 5px;-webkit-transition: all 0.3s ease;-moz-transition: all 0.3s ease;transition: all 0.3s ease;border: 2px solid #CCC;height: 80px;width: 80px;}
.PopularPosts ul li img:hover {border:2px solid #BBB;-moz-transform: scale(1.2) rotate(-1090deg) ;-webkit-transform: scale(1.2) rotate(-1090deg) ;-o-transform: scale(1.2) rotate(-1090deg) ;-ms-transform: scale(1.2) rotate(-1090deg) ;transform: scale(1.2) rotate(-1090deg) ;}
</style>
Note: Make sure you add Popular Posts widget to your blogger sidebar. 

4. Now save your template,

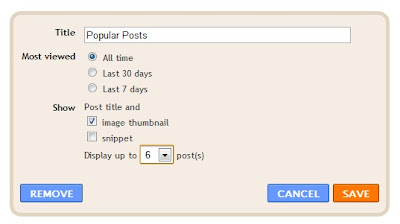
5. Edit your Popular Posts widget setting into something like this...


6. Save it.


Refresh your blog to see the result. Cool huh? Good job!


Leave your comment!

Monday, December 26, 2011

How To Create Google Plus Fan Page For Blogger

Google Plus has launch a Google Plus Fan Page. It's similar to Facebook Fan Page. You can use Google Plus Fan Page for business to promote your products, events, etc. This is how to create and add it into your blog.

Create Google + Fan Page
1. First, go to this page, click on the Product or Brand.

2. Enter the Blog Title and URL, select Category

3. Tick the Agree Page Terms check-box and Click on Create Button.

4. Enter the Tagline and Upload a Profile photo.

6. You're page is almost done, click the Share on Google+ button and Finally Click the Finish button.


Add Fan Page Badge to your Blog
Grow your fans or follower by adding this badge to your blog.

1. Go to Get Started page, click the get the Badge link.

2. Choose a Style of Badge and Language (Leave the Advanced options to Default).


3. There is 2 code to add into your blog.
4. Go to Blogger Dashboard > Design > Edit HTML
5. Search for the </head> tag, add the Code #1 section before it.
6. Save your template.
7. Then, add the Code2 section in HTML/JavaScript gadget and place where you want the badge to be appear.

Finish. That's it! Enjoy! Leave your comment yeah!

Saturday, December 10, 2011

How To Change Linkwithin "You might also like" Message in Blooger

Do you have Linkwithin Related post widget? You want to change the Linkwithin message to another message? Sure you can. Only add some code into it. Let's know how.


Add the red code, above your Linkwithin code:
<script>linkwithin_text='YOUR NEW LINKWITHIN MESSAGE :'</script>
YOUR LINKWITHIN CODE

Yeah, that's all you need. Refresh to see the result.

Hope you like it.

Thursday, November 10, 2011

How To Add Scroll For Blog Archive in Blogger

Salam.

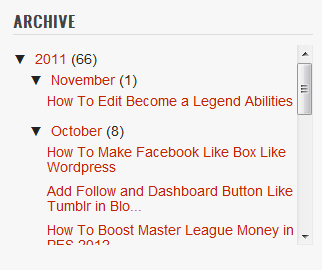
Your blog archive is too damn long to the bottom? Do you wanna add a scroll to your blog? Yes, you just to do this few steps to make your blog archive looks like this.


STEPS:
1. Go to your Dashboard >> Design >> Edit HTML >> Check Expand Widget Templates.

2. Search this code (Ctrl + F), ]]></b:skin>

3. Put this code below, after ]]></b:skin>
#BlogArchive1 .widget-content{
height:300px;
width:auto;
overflow:auto;
}

4. You can change the scroll height by edit the code in red:

5. Save. Refresh to see the result.


+ For more tutorial, just see through the labels.

Tuesday, October 25, 2011

How To Make Facebook Like Box Like Wordpress

Wanna have Facebook Like Box like this? Just like in Wordpress. Watch DEMO [click]


You only need to follow this few steps. Let's start.

INSTRUCTION:
1. Go to your Dashboard >> Design >> Page Element >> Add a Gadget.


2. Paste this code in.
<center>
<iframe frameborder="0" href="%0A%0AYOUR FAN PAGE URL%0A%0A" scrolling="no" src="http://www.facebook.com/plugins/fan.php?id=%0A%YOUR FAN PAGE ID%0A%0A&amp;width=292&amp;height=250&amp;connections=25&amp;stream=false&amp;header=false&amp;logobar=false&amp;css=http://howtohouse.googlecode.com/files/fblike.css" style="height: 230px; width: 85%;"></iframe>
<iframe allowtransparency="true" frameborder="0" scrolling="no" src="http://www.facebook.com/plugins/like.php?href=%0A%0AYOUR FAN PAGE URL%0A%0A&amp;send=false&amp;layout=standard&amp;width=292&amp;show_faces=false&amp;action=like&amp;colorscheme=light&amp;font&amp;height=40" style="border: none; height: 40px; overflow: hidden; width: 250px;"></iframe></center>
3. Change:
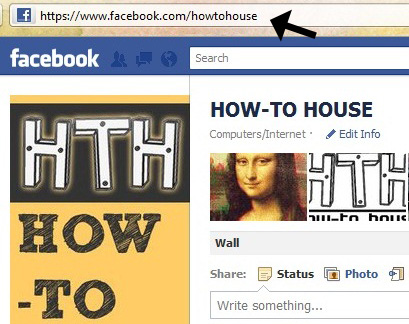
YOUR FAN PAGE URL- Where to find? Just go to your fan page. Copy URL in the URL bar.


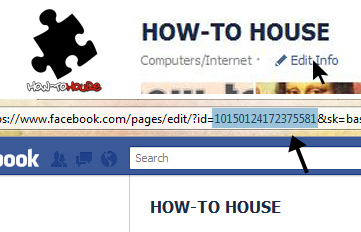
YOUR FAN PAGE ID - On your fan page, click on the Edit Info and copy the ID from the URL bar.


4. Save and FINISH!

Do you like it? ENJOY!

Add Follow and Dashboard Button Like Tumblr in Blogger

Do you like a follow and dashboard button just like in Tumblr? It's look like this;


Live DEMO [click]. Isn't its nice. Let's add it to your blog/site.

STEPS
1. Go to your Dashboard >> Design >> Page Element >> Add a Gadget.


2. Paste this code in.
<div style="display:scroll; position:fixed; top:5px; right:95px;"><a class="linkopacity" href="http://www.blogger.com/follow-blog.g?blogID=YOUR BLOG ID" target="_blank" rel="nofollow" title="Follow" imageanchor="1" style="margin-left: 1em; margin-right: 1em;"><img border="0" src="http://assets.tumblr.com/images/iframe_follow_alpha.png?6" /></a> <div style="display:scroll; position:fixed; top:5px; right:2px;"><a class="linkopacity" href="http://blogger.com/home" target="_blank" rel="nofollow" title="Dashboard" imageanchor="1" style="margin-left: 1em; margin-right: 1em;"><img border="0" src="http://assets.tumblr.com/images/iframe_dashboard_alpha.png?6" /></a></div></div>
3. Change the YOUR BLOG ID with your Blogger. Where to find the ID?

    • Go to Dashboard ->> Design ->> Look at your URL bar.


4. Save and finish.

Enjoy new Tumblr style button.

Sunday, October 16, 2011

How To Disable Image Lightbox in Blogger

Blogger previously has officially launched a lightbox image viewer in Blogger. I had wrote about it in the previous entry. For further info, click here.

But some of the user seems don't like to use it. Want to disable it? Let's know how.

Steps
Log in to Blogger -> Settings | Posts and Comments section (new interface) or the Settings | Formatting section (old interface).

Select “No” next to Lightbox.

• Finish!

Hope you like it!

Spread this entry if you think it's helpful.

Wednesday, October 12, 2011

How To Create Your Own Clock and Add in Blogger

You wanna add some widget like clock. You can do it so. It is good to have a clock in your blog. Time is always important. You can create your own clock and add it into your blog. Let's know how yo.
Let's get started

• Just go this site - click here

• Then, just select between listbox options.

• Customize colors with color pickers.

• Set your clock size with zoom slide.

• Hit the Download button.

• Copy the code and paste in HTML/Javascript

• Finish!

Place the clock on your desire position. Enjoy!

Monday, October 10, 2011

How To Get Email Notification When Someone Submit Form in Google Docs

Assalamualaikum~

In the previous tutorial, we learn to create a free form with Google docs. But some user ask me how to get notify if someone submitted form. We can get notify as soon as possible the form submitted. So, let's know it.

GET EMAIL NOTIFICATION
1. Go to your Google Docs homepage. Click on your form.

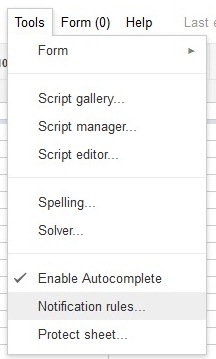
2. New tab will be open. Go to Tools tab -> Notification Rules


3. Then, just click on the Any change are made and email - right away.


4. Save. Yes, you done!

After this, if your form submitted, you will get the email notification right away.

Tuesday, October 4, 2011

How To Create Free Form in Blogger

You just need to use Google Docs. Web forms in Google Docs are a great choice for creating forms like Contact Me/Contact Us or for conducting polls and surveys since it's free and no limits of people can participate. It is also great because all replies are directly saved in an online spreadsheet. It becomes more easy to analyze your own data.


CREATE A FORM
Go to Google Docs, create new form [click]

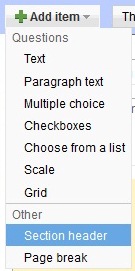
Customize you form. You can add an item as you desire by click the + Add item button.


There is a few item which is; Text, Paragraph Text, Multiple Choices, Checkboxes, Choose from a list, and Scale. 

You can arrange the item by dragging them.

Once you done customizing, you can embed the form by click More Action -> Embed


You also can change the form theme with the provided theme.

You can edit you form. Just go back to your Google Docs page. 

Finish! There you go your own form

Hope this help guys! 

Thursday, September 22, 2011

How To Create jQuery Content Slider in Blogger

Do you know what is content slider? It's like a slideshow. You can watch the demo.


Like it? Let's add it.

Steps:
1. Go to your Dashboard >> Design >> Edit HTML >> Check Expand Widget Templates.

2. Search this code (Ctrl + F), ]]></b:skin>

3. Copy below code and paste it just before the ]]></b:skin> tag.
#contentSlide {
border: 1px solid #000;
background:#212421;
height:263px;
padding:10px 0;
}
#slideshow {
margin:0 auto;
width:640px;
height:263px;
background:transparent url(http://lh6.ggpht.com/_dfnTVAxeWMI/SlTPJpS_axI/AAAAAAAABYA/JS60KVWJ9GQ/bg_slideshow.jpg) no-repeat 0 0;
position:relative;
}
#slideshow #slidesContainer {
margin:0 auto;
width:560px;
height:263px;
overflow:auto; /* allow scrollbar */
position:relative;
}
#slideshow #slidesContainer .slide {
margin:0 auto;
width:540px; /* reduce by 20 pixels of #slidesContainer to avoid horizontal scroll */
height:263px;
}
.control {
display:block;
width:39px;
height:263px;
text-indent:-10000px;
position:absolute;
cursor: pointer;
}
#leftControl {
top:0;
left:0;
background:transparent url(http://lh6.ggpht.com/_dfnTVAxeWMI/SlT8KH99FgI/AAAAAAAABZM/e9gXvHjzltU/control_left.jpg) no-repeat 0 0;
}
#rightControl {
top:0;
right:0;
background:transparent url(http://lh6.ggpht.com/_dfnTVAxeWMI/SlT8KMpFpxI/AAAAAAAABZQ/a207Rx0XuiU/control_right.jpg) no-repeat 0 0;
}

.slide h2, .slide p {
margin:15px;
}
.slide h2 {
font:italic 24px Georgia, "Times New Roman", Times, serif;
color:#212421;
letter-spacing:-1px;
}
.slide img {
float:right;
margin:0 15px;
padding: 1px;
background-color: #212421;
border: 1px solid #999;
}

4.  Now, search this code (Ctrl + F), </head>

5.  Copy below code and paste it just before the </head> tag.
<script src='http://ajax.googleapis.com/ajax/libs/jquery/1.3.2/jquery.min.js' type='text/javascript'/>

<script type='text/javascript'>
//<![CDATA[
$(document).ready(function(){var currentPosition=0;var slideWidth=560;var slides=$('.slide');var numberOfSlides=slides.length;$('#slidesContainer').css('overflow','hidden');slides.wrapAll('<div id="slideInner"></div>').css({'float':'left','width':slideWidth});$('#slideInner').css('width',slideWidth*numberOfSlides);$('#slideshow').prepend('<span class="control" id="leftControl">Clicking moves left</span>').append('<span class="control" id="rightControl">Clicking moves right</span>');manageControls(currentPosition);$('.control').bind('click',function(){currentPosition=($(this).attr('id')=='rightControl')?currentPosition 1:currentPosition-1;manageControls(currentPosition);$('#slideInner').animate({'marginLeft':slideWidth*(-currentPosition)})});function manageControls(position){if(position==0){$('#leftControl').hide()}else{$('#leftControl').show()}if(position==numberOfSlides-1){$('#rightControl').hide()}else{$('#rightControl').show()}}
});
//]]>

6. Save your template. Now go to your Dashboard >> Design >> Page Element >> Add a Gadget >> 'HTML/Javascript'.

7.  Add the code below;
<!-- Slideshow HTML START-->
<div id="contentSlide"><div id="slideshow">
<div id="slidesContainer">

<div class="slide">
<h2>CONTENT TITLE</h2>
<p><a href="POST URL"><img alt="" width="215" src="IMAGE URL" height="145"/></a>POST SUMMARY</p>
</div>

<div class="slide">
<h2>CONTENT TITLE</h2>
<p><a href="POST URL"><img alt="" width="215" src="IMAGE URL" height="145"/></a>POST SUMMARY</p>
</div>

<div class="slide">
<h2>CONTENT TITLE</h2>
<p><a href="POST URL"><img alt="" width="215" src="IMAGE URL" height="145"/></a>POST SUMMARY</p>
</div>

<div class="slide">
<h2>CONTENT TITLE</h2>
<p><a href="POST URL"><img alt="" width="215" src="IMAGE URL" height="145"/></a>POST SUMMARY</p>
</div>

<div class="slide">
<h2>CONTENT TITLE</h2>
<p><a href="POST URL"><img alt="" width="215" src="IMAGE URL" height="145"/></a>POST SUMMARY</p>
</div>

</div>
</div></div>
<!-- Slideshow HTML END -->

8.  To add new slideshow, just add this code;
<div class="slide">
<h2>CONTENT TITLE</h2>
<p><a href="POST URL"><img alt="" width="215" src="IMAGE URL" height="145"/></a>POST SUMMARY</p>
</div>

DONE!

Saturday, September 17, 2011

Blogger Released Official Lightbox Image Viewer System

Do not need to use any hack code to magnify the image on blogger blog anymore. Now Blogger.com has provided the official Lightbox image viewer system. You can take a look at your blog. Just click on the image on your entry post, then it will magnify itself and there is also has image thumbnail under the preview image to select which image you want to look at.


Just click on the [x] button at the right top corner or just click on the dark area to back to normal.

Interesting!

You also can disable this feature - tutorial here.

Thursday, September 15, 2011

How To Add Colorful Effect For Your Links For Blogger


Let's add some fun to your blog by adding cool effect to your links when your visitors hover it. It’ll be lighting and colorful. It's easy and let's do it.


Steps:
1. Go to your Dashboard >> Design >> Page Element >> Add a Gadget.


2. Paste this code below inside :
<script type='text/javascript'>

 //<![CDATA[

 var rate = 25;

 if (document.getElementById)
  window.onerror=new Function("return true")

 var objActive;  // The object which event occured in
  var act = 0;    // Flag during the action
  var elmH = 0;   // Hue
  var elmS = 128; // Saturation
  var elmV = 255; // Value
  var clrOrg;     // A color before the change
  var TimerID;    // Timer ID

 if (document.all) {
  document.onmouseover = doRainbowAnchor;
  document.onmouseout = stopRainbowAnchor;
  }
  else if (document.getElementById) {
  document.captureEvents(Event.MOUSEOVER | Event.MOUSEOUT);
  document.onmouseover = Mozilla_doRainbowAnchor;
  document.onmouseout = Mozilla_stopRainbowAnchor;
  }

 function doRainbow(obj)
  {
  if (act == 0) {
  act = 1;
  if (obj)
  objActive = obj;
  else
  objActive = event.srcElement;
  clrOrg = objActive.style.color;
  TimerID = setInterval("ChangeColor()",100);
  }
  }


 function stopRainbow()
  {
  if (act) {
  objActive.style.color = clrOrg;
  clearInterval(TimerID);
  act = 0;
  }
  }


 function doRainbowAnchor()
  {
  if (act == 0) {
  var obj = event.srcElement;
  while (obj.tagName != 'A' && obj.tagName != 'BODY') {
  obj = obj.parentElement;
  if (obj.tagName == 'A' || obj.tagName == 'BODY')
  break;
  }

 if (obj.tagName == 'A' && obj.href != '') {
  objActive = obj;
  act = 1;
  clrOrg = objActive.style.color;
  TimerID = setInterval("ChangeColor()",100);
  }
  }
  }


 function stopRainbowAnchor()
  {
  if (act) {
  if (objActive.tagName == 'A') {
  objActive.style.color = clrOrg;
  clearInterval(TimerID);
  act = 0;
  }
  }
  }


 function Mozilla_doRainbowAnchor(e)
  {
  if (act == 0) {
  obj = e.target;
  while (obj.nodeName != 'A' && obj.nodeName != 'BODY') {
  obj = obj.parentNode;
  if (obj.nodeName == 'A' || obj.nodeName == 'BODY')
  break;
  }

 if (obj.nodeName == 'A' && obj.href != '') {
  objActive = obj;
  act = 1;
  clrOrg = obj.style.color;
  TimerID = setInterval("ChangeColor()",100);
  }
  }
  }


 function Mozilla_stopRainbowAnchor(e)
  {
  if (act) {
  if (objActive.nodeName == 'A') {
  objActive.style.color = clrOrg;
  clearInterval(TimerID);
  act = 0;
  }
  }
  }


 function ChangeColor()
  {
  objActive.style.color = makeColor();
  }


 function makeColor()
  {
  // Don't you think Color Gamut to look like Rainbow?

 // HSVtoRGB
  if (elmS == 0) {
  elmR = elmV;    elmG = elmV;    elmB = elmV;
  }
  else {
  t1 = elmV;
  t2 = (255 - elmS) * elmV / 255;
  t3 = elmH % 60;
  t3 = (t1 - t2) * t3 / 60;

 if (elmH < 60) {
  elmR = t1;  elmB = t2;  elmG = t2   t3;
  }
  else if (elmH < 120) {
  elmG = t1;  elmB = t2;  elmR = t1 - t3;
  }
  else if (elmH < 180) {
  elmG = t1;  elmR = t2;  elmB = t2   t3;
  }
  else if (elmH < 240) {
  elmB = t1;  elmR = t2;  elmG = t1 - t3;
  }
  else if (elmH < 300) {
  elmB = t1;  elmG = t2;  elmR = t2   t3;
  }
  else if (elmH < 360) {
  elmR = t1;  elmG = t2;  elmB = t1 - t3;
  }
  else {
  elmR = 0;   elmG = 0;   elmB = 0;
  }
  }

 elmR = Math.floor(elmR).toString(16);
  elmG = Math.floor(elmG).toString(16);
  elmB = Math.floor(elmB).toString(16);
  if (elmR.length == 1)    elmR = "0"   elmR;
  if (elmG.length == 1)    elmG = "0"   elmG;
  if (elmB.length == 1)    elmB = "0"   elmB;

 elmH = elmH   rate;
  if (elmH >= 360)
  elmH = 0;

 return '#'   elmR   elmG   elmB;
  }

 //]]>

 </script>

3. Save it. Done!
You can change;
var rate = 25;
The code is to control the speed of color transformation by increasing or decreasing the number.

Cheers! 

Wednesday, September 14, 2011

How To Add Page Navigation to Blogger

Page navigation script will replaces the default blog pager (links to newer, older and home pages) with numbered page navigation. Furthermore, it offers the ability to customize the number of page links and the number of posts displayed on each page. It gives you more easy to discover your old entry. Let's know how.
Steps:
1. Go to your Dashboard >> Design >> Page Element >> Add a Gadget.


2. Paste this code below inside :
     <style type="text/CSS">

    .showpageArea a {
    text-decoration:underline;
    }
    .showpageNum a {
    text-decoration:none;
    border: 1px solid #7AA1C3;
    margin:0 3px;
    padding:3px;
    }
    .showpageNum a:hover {
    border: 1px solid #7AA1C3;
    background-color:#F6F6F6;
    }
    .showpagePoint {
    color:#333;
    text-decoration:none;
    border: 1px solid #7AA1C3;
    background: #F6F6F6;
    margin:0 3px;
    padding:3px;
    }
    .showpageOf {
    text-decoration:none;
    padding:3px;
    margin: 0 3px 0 0;
    }
    .showpage a {
    text-decoration:none;
    border: 1px solid #7AA1C3;
    padding:3px;
    }
    .showpage a:hover {
    text-decoration:none;
    }
    .showpageNum a:link,.showpage a:link {
    text-decoration:none;
    color:#7AA1C3;
    }
    </style>

    <script type="text/JavaScript">

    function showpageCount(json) {
    var thisUrl = location.href;
    var htmlMap = new Array();
    var isFirstPage = thisUrl.substring(thisUrl.length-5,thisUrl.length)==".com/";
    var isLablePage = thisUrl.indexOf("/search/label/")!=-1;
    var isPage = thisUrl.indexOf("/search?updated")!=-1;
    var thisLable = isLablePage ? thisUrl.substr(thisUrl.indexOf("/search/label/") 14,thisUrl.length) : "";
    thisLable = thisLable.indexOf("?")!=-1 ? thisLable.substr(0,thisLable.indexOf("?")) : thisLable;
    var thisNum = 1;
    var postNum=1;
    var itemCount = 0;
    var fFlag = 0;
    var eFlag = 0;
    var html= '';
    var upPageHtml ='';
    var downPageHtml ='';

    var pageCount = 2;
    var displayPageNum = 5;
    var upPageWord = 'Previous';
    var downPageWord = 'Next';

    var labelHtml = '<span class="showpageNum"><a href="/search/label/' thisLable '?&max-results=' pageCount '">';

    for(var i=0, post; post = json.feed.entry[i]; i  ) {
    var timestamp = post.published.$t.substr(0,10);
    var title = post.title.$t;
    if(isLablePage){
    if(title!=''){
    if(post.category){
    for(var c=0, post_category; post_category = post.category[c]; c  ) {
    if(encodeURIComponent(post_category.term)==thisLable){
    if(itemCount==0 || (itemCount % pageCount ==(pageCount-1))){
    if(thisUrl.indexOf(timestamp)!=-1 ){
    thisNum = postNum;
    }

    postNum  ;
    htmlMap[htmlMap.length] = '/search/label/' thisLable '?updated-max=' timestamp 'T00%3A00%3A00%2B08%3A00&max-results=' pageCount;
    }
    }
    }
    }//end if(post.category){

    itemCount  ;
    }

    }else{
    if(title!=''){
    if(itemCount==0 || (itemCount % pageCount ==(pageCount-1))){
    if(thisUrl.indexOf(timestamp)!=-1 ){
    thisNum = postNum;
    }

    if(title!='') postNum  ;
    htmlMap[htmlMap.length] = '/search?updated-max=' timestamp 'T00%3A00%3A00%2B08%3A00&max-results=' pageCount;
    }
    }
    itemCount  ;
    }
    }

    for(var p =0;p< htmlMap.length;p  ){
    if(p>=(thisNum-displayPageNum-1) && p<(thisNum displayPageNum)){
    if(fFlag ==0 && p == thisNum-2){
    if(thisNum==2){
    if(isLablePage){
    upPageHtml = labelHtml   upPageWord  '</a></span>';
    }else{
    upPageHtml = '<span class="showpage"><a href="/">'  upPageWord  '</a></span>';
    }
    }else{
    upPageHtml = '<span class="showpage"><a href="' htmlMap[p] '">'  upPageWord  '</a></span>';
    }

    fFlag  ;
    }

    if(p==(thisNum-1)){
    html  = '<span class="showpagePoint">' thisNum '</span>';
    }else{
    if(p==0){
    if(isLablePage){
    html = labelHtml '1</a></span>';
    }else{
    html  = '<span class="showpageNum"><a href="/">1</a></span>';
    }
    }else{
    html  = '<span class="showpageNum"><a href="' htmlMap[p] '">'  (p 1)  '</a></span>';
    }
    }

    if(eFlag ==0 && p == thisNum){
    downPageHtml = '<span class="showpage"> <a href="' htmlMap[p] '">'  downPageWord  '</a></span>';
    eFlag  ;
    }
    }//end if(p>=(thisNum-displayPageNum-1) && p<(thisNum displayPageNum)){
    }//end for(var p =0;p< htmlMap.length;p  ){

    if(thisNum>1){
    if(!isLablePage){
    html = '' upPageHtml ' ' html  ' ';
    }else{
    html = '' upPageHtml ' ' html  ' ';
    }
    }

    html = '<div class="showpageArea"><span style="COLOR: #000;" class="showpageOf"> Pages (' (postNum-1) ')</span>' html;

    if(thisNum<(postNum-1)){
    html  = downPageHtml;

    }

    if(postNum==1) postNum  ;
    html  = '</div>';

    if(isPage || isFirstPage || isLablePage){
    var pageArea = document.getElementsByName("pageArea");
    var blogPager = document.getElementById("blog-pager");

    if(postNum <= 2){
    html ='';
    }

    for(var p =0;p< pageArea.length;p  ){
    pageArea[p].innerHTML = html;
    }

    if(pageArea&&pageArea.length>0){
    html ='';
    }

    if(blogPager){
    blogPager.innerHTML = html;
    }
    }

    }
    </script>

    <script src="/feeds/posts/summary?alt=json-in-script&callback=showpageCount&max-results=99999" ; type="text/javascript"></script>

3. If you are using a domain other than .blogspot.com or .com, change  the bolded red text .com with your domain extension. E.g; if your domain ends with .info or .biz than replace .com with .info or .biz . If blogspot user, leave it .com.

4. Drag your HTML/Javascript widget that you've just pasted the code to the area just below your 'Blog Posts'.

5. Save and DONE!


That's it. Finish! Enjoy guys!

[resource]

Tuesday, September 13, 2011

Change Blogger Favicon More Easily

HH already made a tutorial about how to change favicon previously. Now for this tutorial, it's more easier than previous trick. Blogger already got the service for you. You only need to choose your own or create yourself. Let's know how.

Steps:
1. Go to Dashboard ->> Design ->> Page Elements ->> Favicon. Click 'Edit' button.

2. You can download a lot of favicon free on the internet. Click here

3. Upload your favicon image that you downloaded.


4. Save. Preview your favicon.

Use your own image as favicon
1. If you wanna use your own image/created icon. Blogger favicon currently supported icon format only. You need to convert it to icon format (.ico).

2. You can convert your image using iconj pic to icon converter.

3. Click "Upload" button and your own image/created icon.

4. After finish uploaded, it will look like a screenshot below. Then, click "Continue".

5. Download your converted icon. 

6. Now, upload your icon just like the above method.

7. Save & DONE!

Preview your template to see the result. 


Here are a quick guideline to know the icon format in each platform.
Website Favicon: 16x16 pixels and ICO format is the standard. However, newer browsers also support other GIF, PNG and JPG formats.
Animated Favicon: animated GIF upload is must, and the export format should be 16x16 pixels GIF file.
Windows XP: 16x16, 24x24, 32x32 and 48x48 pixels icon in ICO file format.
Windows 7, Vista: up to 256x256 pixels PNG icon.
iPhone: 57x57 pixels PNG icon. iPhone itself automatically rounds off the corners and adds a slight glassy reflection on the icon image.
iPad: 72x72 pixels PNG icon.
Android: 72x72, 48x48 and 36x36 pixels PNG icons used by the Android Market and the launchers.

Enjoy!

Monday, September 12, 2011

How To Add Google Plus Profile Widget in Blogger

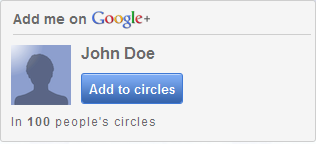
This widget will show real time followers stats of Google Plus circles and also with a “Add me To Circles”  Button. It's completely customizable. The number of followers displayed automatically. You just need to get the code and put it on your blog. Add it now!

Steps:
1. Go to Google Plus Widget page.

2.  Click the "Get Widget" button.

3. Enter your Google+ ID in the Basic Settings tab. Get your Profile ID on your Google+ profile page.


4. You can the widget width as you desire. You can also change the language of the widget from basic settings.  Currently 9 languages are supported.

5. Once you done customizing, click "Get Code" button to get your widget code.

6. Now, go to your Dashboard ->> Design ->> Page Element ->> Add a Gadget ->> HTML/Javascript.


7. Paste the code in.

8. Save and DONE!

Do you like it? View the  Google+ widget demo. Click here

Enjoy! :)

How To Add Static Twitter Follow Me Button in Blogger

Wanna make your visitor to easy to follow you in Twitter? Twitter is the good social network to promote your blog. Why? Because Twitter is second most popular social network with 200,000,000 estimated unique monthly visitors according to eBizMBA. This widget is the best to do so . Let's add it.

Steps:
1. Go to go2web20 site who provide this button.

2. Fill a small form to customize your Twitter "Follow Me" button. Such as Your Twitter Name, Label, Color.

3. When you finish customizing, click the Update Code button.

4. Now, go to your Dashboard >> Design >> Page Element >> Add a Gadget.


5. Paste the code in.

6. Save and finish.

Done and enjoy!

Sunday, September 11, 2011

How To Add Image Magnifier in Blogger

This the creative hack to enlarge or zoom image in blogger. With this hack, you will be able to zoom in the image in blogger by clicking on the image. It's a simple hack. Only need a few steps to add it into your blog.


Steps:
1. Go to your Dashboard >> Design >> Edit HTML.

2. Search this code (Ctrl + F), </body>

3. Copy and paste this just CODE above </body> tag.

4. Save your template.

How to apply Image Magnify:

• Add this class="magnify" data-magnifyby="1.5"  on each image you want to magnify. 

• You need to go to Edit HTML section instead of Compose section. Example :
<img class="magnify" data-magnifyby="1.5" src="Image URL" />
• Finish.

Nice and easy. :)

Thursday, September 8, 2011

How To Add Twitter Flying Bird in Blogger

You have a blog and twitter account? Many of you already have their own accounts. This widget will give your visitors to easily communicate with your twitter account. The bird widget will fly over the site. it's compatible with all browsers. You will love it.

Steps
1. Go to your Dashboard >> Design >> Page Element >> Add a Gadget.


2. Paste this code below in it :
<script src='https://sites.google.com/site/howtohouse/hth-scripts/twitterflybird.js' type='text/javascript'>
</script>
<script type='text/javascript'>
var twitterAccount = "howtohouse";
var tweetThisText = " <data:blog.pageTitle/> : <data:blog.url/> ";
tripleflapInit();
</script>

3. Replace howtohouse with your twitter account username.

4. Save and DONE!

Fly bird fly! :)


#credits: way2blogging

Wednesday, September 7, 2011

How To Add Floating Share Button Beside The Post

This widget make it easy for visitors to share any articles of your blog at any time. This widget is floating on the edge of your blog even if you scroll down. By a single click, your visitors can spread the contents of your blog to the world.

Add it to your blog.


1. Go to your Dashboard >> Design >> Page Element >> Add a Gadget.


2. Paste this code below in it :
<style>

#floatdiv {
position:fixed;
bottom:15%;
margin-left:-75px;
z-index:10;
float:left;
padding-bottom:2px;

}

#mbtsidebar {
        background:#fff;
        border-top:1px solid #ddd;
        border-left:1px solid #ddd;
        border-bottom:1px solid #ddd;
        border-radius:5px;
       -moz-border-radius:5px;
       -webkit-border-radius:5px;
        padding-left:5px;
        width:60px;
        margin:0 0 0 5px;
}

.fb_share_count_top {width:52px !important;}

.fb_share_count_top, .fb_share_count_inner {-moz-border-radius:3px;-webkit-border-radius:3px;}

.FBConnectButton_Small, .FBConnectButton_RTL_Small {width:52px !important; -moz-border-radius:3px;/*bs-fsmsb*/-webkit-border-radius:3px;}

.FBConnectButton_Small .FBConnectButton_Text {padding:2px 2px 3px !important;-moz-border-radius:3px;-webkit-border-radius:3px;font-size:8px;}
</style>

<div id="floatdiv">
<div id="mbtsidebar">
    <table cellpadding="1px" cellspacing="0">


    <tr>
    <td style="padding:5px 0px 0px 0;">
<a href="http://twitter.com/share" class="twitter-share-button" data-count="vertical" data-via="howtohouse">Tweet</a><script type="text/javascript" src="http://platform.twitter.com/widgets.js"></script>
    </td>
    </tr>

    <tr>
    <td style="padding:5px 0 2px 0;">
    <a name="fb_share" type="box_count" href="http://www.facebook.com/sharer.php">Share</a><script src="http://static.ak.fbcdn.net/connect.php/js/FB.Share" type="text/javascript"></script>
    </td>
    </tr>
    <tr>
    <td style=" padding:5px 0px 0px 0px;">

<script src='http://apis.google.com/js/plusone.js' type='text/javascript'> {lang: &#39;en-US&#39;} </script>

<g:plusone size="Tall" expr:href="data:post.url">
    </g:plusone></td>
    </tr>
<tr>
    <td>
<p style=" line-height:0px; font-size:10px; font-weight:bold; text-align:center;"><a style="color:#D3D3D3;" href="http://adf.ly/2cZxG" target="_blank">Want it?</a></p>
    </td>
    </tr>
    </table>
</div>
</div>

3. Save & DONE!

Customization

Align left or right, edit : margin-left:-75px;
Background color, edit : background:#fff;

If you want the widget to appear only on the post page, follow this tutorial.

Enjoy!

[source]

Saturday, April 16, 2011

How To Scan Your Site or Blog From Any Virus


Are you worried about your site or blog health? If your site has a virus, people will scare to visit your site or blog and as a result your site traffic will drop! So, to check your site health and delete any virus or malicious software from your site, you can follow this method.

There are 3 free website scanning online you can use to check whether your blog infected by malicious software. Let's start check your site health.

1 - Google tools :
1. Google will gives you report about your site’s health immediately. Follow this link to check your site...
http://www.google.com/safebrowsing/diagnostic?site=http://yoursite.com

2. Change yoursite.com with your site name,

http://www.google.com/safebrowsing/diagnostic?site=http://www.place2how-to.com/

3. Then, copy and paste it to your browser and hit Enter. You will get a result from Google. [screenshot].


2 - AVG Online Web Page Scanner : 
1. The AVG LinkScanner Drop Zone lets you check the safety of individual web pages you are about to visit or your own web site.

2. Just  insert your website URL, then hit Scan button.


3 - Dr.WEB scanner :
1. Another method to scan your site. Using Dr.WEB scanner.
 
2. By simply paste your blog URL and click Scan, it will scan your site immediately.


Hope this HOW-TO help you to protect your website or blog from any virus attack or malicious software. 

ENJOY!


Followers

Sponsor

 
Powered by Blogger.